After discussing the origins of the word marmalade several weeks ago (you can read the post here) the answer to this fortnight’s challenge “In a Jam” seemed obvious. You may remember that the original marmalade was actually a thick, quince paste which was imported from Portugal at the very end of the 15th century. Soon English confectioners and housewives were making their own version of the sweetmeat, using not only quinces but also apples, peaches, plums, damsons, pears and medlars.[1] Early recipes for orange marmalade hark back to these fruit pastes, Sir Hugh Platt’s book Delightes of Ladies published in 1602 has a recipe for ‘Marmelade of Lemmons or Orenges’ which is essentially a flavoured apple past while Gervase Markham in his book Country Contentments published in 1615 offers an orange marmalade which is strained into boxes, suggesting it was much thicker than what we would normally consider marmalade.
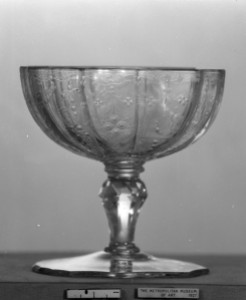
Sweetmeat Glass. 1750, Bohemian. Glass. via www.metmuseum.org
The earliest known recipe for marmalade in its modern form was written down by Rebecca Price in 1681, it was her mother’s recipe for a spoon-able jelly with shredded rind. Another early recipe is held by the Scottish Archives, it dates to 1683 and was probably written down by the Countess of Sutherland. You can see a copy of the recipe here, but be warned it is nearly illegible. In published recipe books the change didn’t occur until slightly later, in 1714 with the publication of Mary Kettilby’s A Collection of above Three Hundred Receipts.
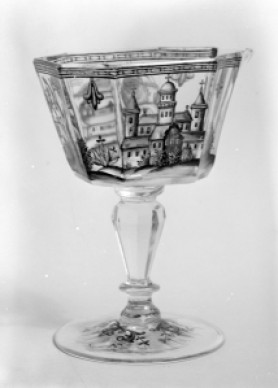
Sweetmeat Glass. ca. 1740, German. Glass. via www.metmuseum.org
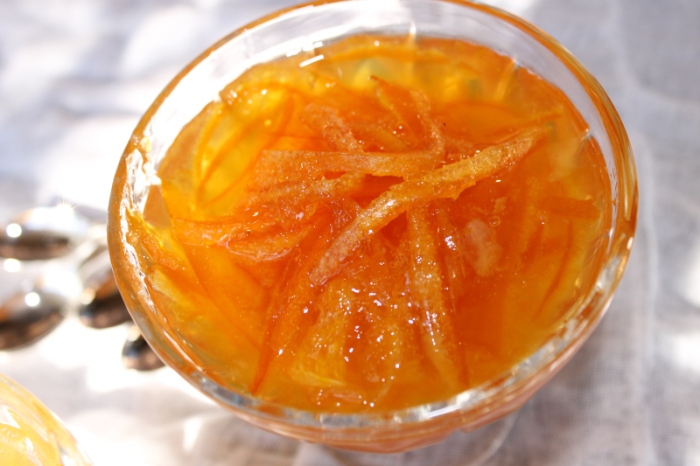
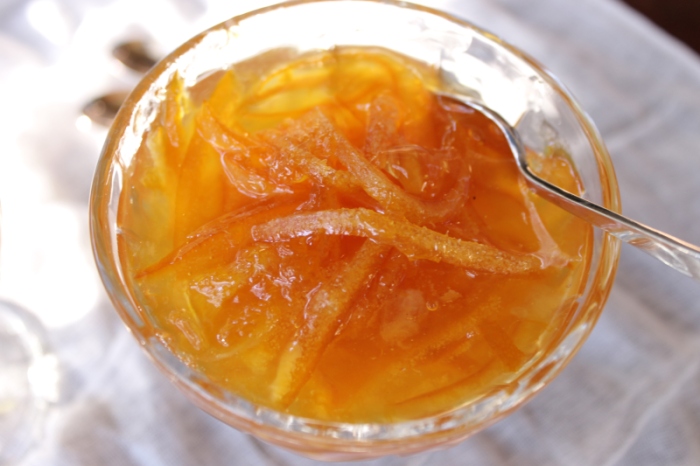
Jellied marmalades, as opposed to cut marmalades which were the thick pastes popular until the end of the 18th century, came in two basic types: beaten or pounded and transparent. The difference is to do with the treatment of the peel, in a pounded marmalade the peel was pounded together with the pulp giving a cloudy jelly while transparent jellies were a clear jelly containing chips or finely cut strips of peel. Both types were served with the dessert course, alongside a range of other sweetmeats including ice creams, jellies, biscuits, nuts, fresh fruit, flummeries, creams, syllabubs and cakes. Wet sweetmeats like marmalade were served in salvers and ornate sweetmeat dishes, such as those pictured.
The dishes were laid out in symmetrical patterns on the table, arranged around an ornate centrepiece or pyramid of sweets. Hannah Glasse’s advice for young ladies arranging the table is as follows:
“The above middle frame [the centerpiece] should be made either in three parts or five, all to join together, which may serve on different occasions; on which suppose gravel walks, hedges, and variety of different things, as a little Chinese temple for the middle, or any other pretty ornament; which ornaments are to be bought at the confectioners, and will serve year after year; the top, bottom, and sides are to be set out with such things as are to be got, or the season of the year will allow, as fruits, nuts of all kinds, creams, jellies, whip syllabubs, biscuits &c. &c. And as many plates as you please according to the size of the table. All this depends wholly on a little experience, and a good fancy to ornament in a pretty manner; you must have artificial flowers of all sorts, and some natural out of a garden in summer time do very intermixed.”[2]
A later edition of the same book shows exactly how the dishes should be laid out[3]:
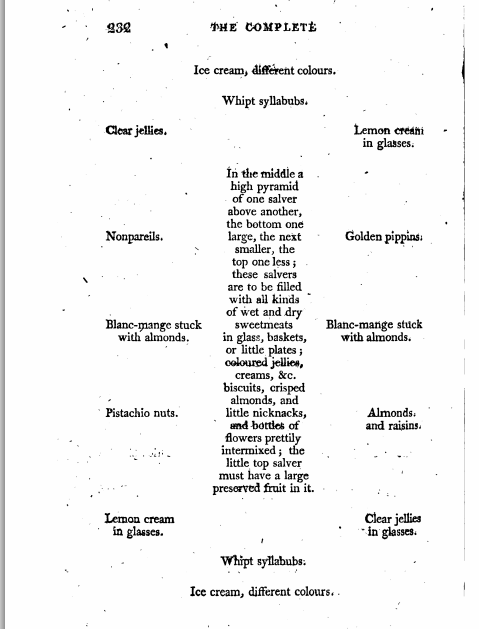
A bill of fare for the dessert course from The Compleat Confectioner by Hannah Glasse and Maria Wilson, 1800.
The Recipe
Like many recipes books of the time, Elizabeth Raffald’s The Experienced English House-keeper (1769) included recipes for both pounded and transparent marmalade. I used the recipe for Transparent Marmalade as follows:
“TAKE very pale Seville Oranges, cut them in Quarters, take out the Pulp, and put it into a Bason, pick the Skins and Seeds out, put the Peels in a little Salt and Water, let them stand all Night, then boil them in a good Quantity of Spring Water ‘till they are tender, then cut them in very thin Slices, and put them to the Pulp, to every Pound of Marmalade, put a Pound and a half of double refined Sugar beat fine, boil them together gently for twenty Minutes; if it is not clear and transparent, boil it five or six Minutes longer, keep stirring it gently all the Time, and take Care you do not break the Slices; when it is cold, put it into Jelly or Sweetmeat Glasses, tie them down with Brandy Papers over them.
They are pretty for a Desert of any Kind.”[4]
Although at first glance I thought that this recipe was quite similar to modern marmalade recipes, there were a couple of things that tripped me up. First was what to do with the pulp, I cut the oranges into quarters and then removed the peel from the flesh, however that left a lot of membrane on the flesh. I think there are probably two options for what you could do here, either do as I did and leave them more or less intact during the cooking process and then removing the membrane when the flesh has cooked down to a pulp. The other option would be to supreme the oranges which probably gives a slightly better result, but is a lot fiddlier.
The second question that I had to answer was what to do with the pith of the orange. Once again there are two basic options, leave it on because there are no specific instructions in the recipe, or after the peels have boiled you can use a spoon to scrape out the soft white pith. Basically the choice depends on how bitter you want your marmalade to be, with more pith making it more bitter, and on how exactly you want to follow the recipe. Since I’m not a huge fan of bitter marmalade, and because I thought it would make for a clearer jelly, I chose to remove the pith.
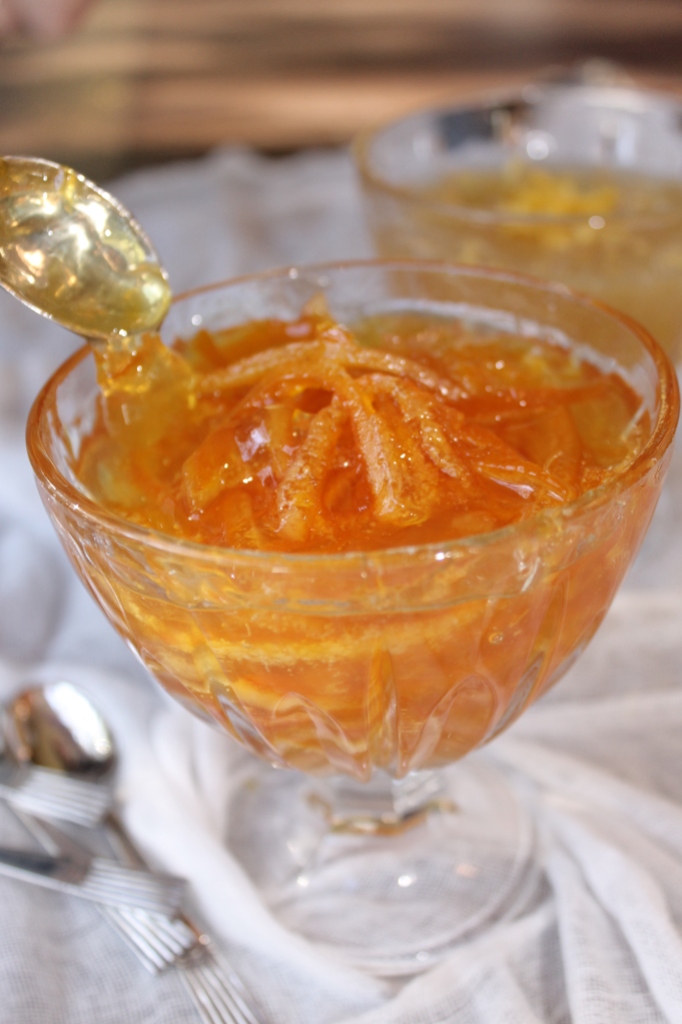
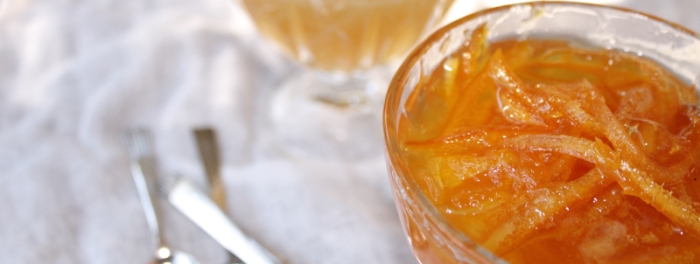
Transparent Marmalade in the foreground, and Lemon Jelly in the background. I’ll be posting a recipe for it soon!
Which brings us to the final, and probably most controversial issue. Seville oranges. To make this recipe properly you need Seville oranges. However, if you are like me and have a sudden compulsion to make marmalade with no Seville oranges to hand then don’t panic! Warning, I’m now going to say something that is worthy of excommunication in some circles, nonetheless I stand by the fact that you can make perfectly good marmalade with sweet oranges. It will be neither as intense nor as bitter as marmalade made from Seville oranges, but then in my book that’s not necessarily a bad thing. So if you can’t get Seville oranges/don’t want to, don’t be afraid to do as I did and use sweet oranges.
The Redaction
Mrs Raffald’s Transparent Marmalade
1 kg oranges
1 tsp salt
Sugar
- Quarter the oranges and pulling gently at one corner of the quarter, peel the skin from the flesh. If you would prefer to supreme the oranges see the link above but try to keep the peel in large pieces. Place the peels in a bowl with the salt and cover with cold water. Place the flesh in another bowl in the refrigerator, removing all the seeds that you can find, and leave both bowls overnight.
- The next day drain the peels, place them in a saucepan and cover them with fresh water. Bring to the boil and boil until a skewer will easily pass through the peels. Drain.
- Once the peels are slightly cooled take a spoon and scrape the white pith from the inside of the peels. Discard the pith then slice the peels into thin slivers, the thinner the better.
- Add the sliced peels to the pulp and weigh the mixture. Place the fruit in a saucepan and to every 450g of fruit add 680g of sugar. Bring to the boil and boil for 20 mins, mashing the fruit gently so that you can remove the membranes which can simply be lifted out and discarded.
- After 20 mins check the set of the marmalade by turning off the heat and placing half a teaspoonful on a cold saucer. If the marmalade separates into a jelly surrounded by a thinner liquid then it needs more time. You should be able to run your finger through the marmalade (but be careful it’s hot!), leaving a distinct channel with a wrinkled surface (if you’re not sure exactly how to test for a set there is a video link at the bottom of the page). If it is not setting then return it to the heat and cook for another 5 minutes before testing again. Continue until you reach setting point.
- Once you have reached setting point the marmalade can either be decanted into hot, sterilised jars to keep for several months, or into clean sweetmeat bowls if you want to serve it as a dessert.
The Recipe: Transparent Marmalade from The Experienced English House-keeper by Elizabeth Raffald (available here)
The Date: 1769
How did you make it?: See above
Time to complete?: Probably about 1hr ½ active work, plus leaving it overnight.
Total cost: Maybe $3 for the oranges which I got on special and then the same for the sugar so $6 all up.
How successful was it?: Very tasty, just a hint of bitterness. One of my loyal taste-testers said it was the best marmalade she had ever had.
How accurate?: Well, I didn’t use Seville oranges, and I really need to look into what sugar was like at the time, but I’d say it was probably quite different. I had to make some decisions where the directions were unclear and it’s hard to tell how much that affected the authenticity but I’d say it was a decent approximation.
Marmalade Links
Learn how to supreme an orange here
Watch how to test for a set in jam here
[1] C. Anne Wilson, The Book of Marmalade (Great Britain: Prospect Books, 2010), 28–41.
[2] Hannah Glasse, The Compleat Confectioner (London: Printed and sold at Mrs. Ashburner’s China Shop, the Corner of Fleet Ditch; at Yewd’s Hat Warehous, near Somerset Hous; at Kirk’s Toyshop, in St Paul’s Church Yard; at Deard’s Toyshop, facing Arlington-Street, Piccadilly; By I. Pottinger, at the Royal Bible, in Pater-Noster Row; and by J Williams, opposite St. Dunstan’s Church, Fleet Street, 1760), 255.
[3] Hannah Glasse and Maria Wilson, The Complete Confectioner: Or, Housekeeper’s Guide: To a Simple and Speedy Method of Understanding the Whole Art of Confectionary; the Various Ways of Preserving and Candying, Dry and Liquid, All Kinds of Fruit, Nuts, Flowers, Herbs, &c. … the Different Ways of Clarifying Sugar … Also the Art of Making Artificial Fruit … To Which Are Added Some Bills of Fare for Deserts for Private Families (J. W. Meyers, 1800), 232.
[4] Elizabeth Raffald, The Experienced English House-Keeper: For the Use and Ease of Ladies, House-Keepers, Cooks, &c. : Wrote Purely from Practice and Dedicated to the Hon. Lady Elizabeth Warburton … : Consisting of Near 800 Original Receipts, Most of Which Never Appeared in Print … (J. Harrop, 1769), 201.
[1] Hannah Glasse and Maria Wilson, The Complete Confectioner: Or, Housekeeper’s Guide: To a Simple and Speedy Method of Understanding the Whole Art of Confectionary; the Various Ways of Preserving and Candying, Dry and Liquid, All Kinds of Fruit, Nuts, Flowers, Herbs, &c. … the Different Ways of Clarifying Sugar … Also the Art of Making Artificial Fruit … To Which Are Added Some Bills of Fare for Deserts for Private Families (J. W. Meyers, 1800), 232.
Bibliography
Glasse, Hannah. The Compleat Confectioner. London: Printed and sold at Mrs. Ashburner’s China Shop, the Corner of Fleet Ditch; at Yewd’s Hat Warehous, near Somerset Hous; at Kirk’s Toyshop, in St Paul’s Church Yard; at Deard’s Toyshop, facing Arlington-Street, Piccadilly; By I. Pottinger, at the Royal Bible, in Pater-Noster Row; and by J Williams, opposite St. Dunstan’s Church, Fleet Street, 1760.
Glasse, Hannah, and Maria Wilson. The Complete Confectioner: Or, Housekeeper’s Guide: To a Simple and Speedy Method of Understanding the Whole Art of Confectionary; the Various Ways of Preserving and Candying, Dry and Liquid, All Kinds of Fruit, Nuts, Flowers, Herbs, &c. … the Different Ways of Clarifying Sugar … Also the Art of Making Artificial Fruit … To Which Are Added Some Bills of Fare for Deserts for Private Families. J. W. Meyers, 1800.
Raffald, Elizabeth. The Experienced English House-Keeper: For the Use and Ease of Ladies, House-Keepers, Cooks, &c. : Wrote Purely from Practice and Dedicated to the Hon. Lady Elizabeth Warburton … : Consisting of Near 800 Original Receipts, Most of Which Never Appeared in Print … J. Harrop, 1769.
Wilson, C. Anne. The Book of Marmalade. Great Britain: Prospect Books, 2010.


![George Flegel, Still Life with Bread and Confectionary, 17th century, [Public Domain] via Wikimedia Commons. Here you can see comifts, spices which have been covered in layer after layer of sugar, wine and a moulded biscuit, perfect for rounding off the meal.](https://turnspitandtable.files.wordpress.com/2014/11/george_flegel_still-life_with_bread_and_confectionary.jpg?resize=700%2C892)


![Portrait of 12 yr old Marie Antoinette by Martin van Meytens c. 1767-1768 [Public domain], via Wikimedia Commons](https://turnspitandtable.files.wordpress.com/2014/10/marie_antoinette_young2.jpg)
![Portrait of Sir K. Digby from the Wellcome Library London. Line engraving by R.V. Verst after Anthony Van Dyke. [CC-BY-4.0 (http://creativecommons.org/licenses/by/4.0)], via Wikimedia Commons](https://turnspitandtable.files.wordpress.com/2014/10/portrait_of_sir_k-_digby_wellcome_l0006443.jpg)
![Ribes currants. By Petr Kratochvil [Public domain], via Wikimedia Commons](https://turnspitandtable.files.wordpress.com/2014/10/blackcurrant_by_petr_kratochvil.jpg)


![Rock Wallaby in Rocks. By Bilby (Own work) [CC-BY-3.0 (http://creativecommons.org/licenses/by/3.0)], via Wikimedia Commons](https://turnspitandtable.files.wordpress.com/2014/09/rock_wallaby_in_rocks.jpg)


![Image taken from page 23 of 'Recollections of Old Christmas: a masque. Performed at Grimston. [By Thomas C. Croker.]' Courtesy of the British Library.](https://turnspitandtable.files.wordpress.com/2014/09/pudding-picture.jpg)

