I don’t quite know why, but I had kind of assumed that candied orange peel would date to the late 17th century, like jellied marmalades. I was quite surprised, then, to find that candied fruits, and candied peel, are actually quite a bit older.
Preserving in a sugary syrup – whether it’s made from honey, wine, grape must, or sugar – is a very effective way of preserving seasonal products. There is a long history of preserved or candied fruits in China and Korea, dating back to the 10th century, and the Romans preserved quinces and other fruits in honey, or in desfrutum (boiled down new wine) or must.[1]
Candied citrus in particular was an expensive gift, and an extravagant ingredient during the 14th and 15th centuries.[2] In Medieval Europe, both honey and sugar were used for preserving a range of fruits, herbs, nuts and spices. This late fourteenth century recipe from The Menagier de Paris uses honey:
To make orengat, cut the peel of an orange into five segments, and with a knife, scrape off the white pith that is inside. Then soak them in nice, fresh water for nine days, and change the water every day; then boil them in fresh water until it comes to the boil, then spread them on a cloth and let them dry thoroughly; then put them ina pot with enough honey to cover the completely, and boil over a low fire, and skim it; and when you think that the honey is done (to see if it is done, put some water into a bowl and drop into that water a drop of the honey, and if it spreads it is not cooked; and if that drop of honey holds its shape in the water without spreading, it is done); then, remove your orange peel, and make a layer of it and sprinkle ginger powder on top, then another layer, and sprinkle etc., ad infinitum; leave for a month or longer before eating.[3]
In the fifteenth century, Platina suggests that sugar could be used for candying almonds, pine-nuts, hazelnuts, coriander, anise and cinnamon, while honey was better for apples, gourds, citrons and nuts.[4] The Catalan book on confectionary Libre de totes maneres de confits gives both options in most cases, whereas the Italian Libro per Cuoco only uses honey for candying orange peel.[5] Over time, as sugar become cheaper and more widely available, the use of honey became less common.
In England, by the sixteenth century, the primary distinction is between wet suckets (stored in syrup) and dry suckets (removed from the syrup and dried).[6] Nearly every published cookbook and private receipt book that survives contains recipes for these kinds of sweetmeats, which would be served in the banquet course at the end of the meal. Sugar was considered health promoting, especially when combined with spices and it was eaten at the end of the meal to promote digestion (for more on this see my post on gingerbread).[7]
The range of products which were candied is staggering. Fresh fruits, seeds, spices, green walnuts, marshmallow, angelica, lettuce stalks (sometimes called gorge d’ange or angel’s throat), and eringo (or sea-holly) roots were all fair game. Nor has the tradition completely died out. Many types of dry suckets still survive: in England, particularly around Christmas, baked goods often include candied citrus peel, candied ginger, glace cherries and candied angelica. In France, candied melon is an essential ingredient in calissons while marrons glaces (candied chestnuts) are a specialty of Northern Italy and the Piedmont region. Elvas, Portugal, is famous for its candied greengages. Wet suckets have been less enduring, but you can still buy ginger preserved in syrup.

Given how many 16th and 17th century still lives exist showing all kinds of sweetmeats, there are surprisingly few with candied fruits. This early 17th century painting shows a range of candied fruits, both whole and in sections. On the left at the back is what looks like a whole candied citron, slices of another type of citrus, and what might be candied greengages. On the plate in front are candied figs, or maybe small pears. The boxes on the right would hold fruit pastes, and the jars contain fruits preserved in syrup. Juan van der Hamen, Still Life with Sweets and Pottery, 1627. [Public domain], via Wikimedia Commons
The Recipe
All of this leads us to today’s recipe, which comes from Martha Washington’s Booke of Sweetmeats (the second half of the Booke of Cookery). This receipt book is typical in that it provides a range of recipes for preserving and candying. The candying section alone has recipes for rose leaves, marigolds, violets, rosemary flowers, borage flowers, eringo roots, elecampane, ginger, orange peel, gooseberries, angelico stalks and roots, and apricots.[8]
To Candy Orring Pills
Take Civill orringes & pare them very thin. Then cut them in little pieces, & lay them in faire water a day & a night, & shift them evening and morning. Then boyle them, & shift them when the water is bitter into another water, & continew this till the water & boyling hath made them soft & yt theyr bitterness be gon. Then dreyne ye water from them, & make a thin sirrup, in which boyle them a pritty while. Then take them out & make another sirrup a little stronger, & boyle them a while in yt. Then dreyne ye sirrup from them, & boyle another sirrup to candy heigh, in wch put them. Then take them out & lay them on plats one by one. When they are dry, turne them & then they are done.[9]
This is a fairly straightforward recipe for candied orange peels, and indeed modern recipes aren’t dissimilar. The recipe explicitly calls for Seville oranges, which are very bitter (they are still preferred for marmalade) and this explains the soaking and boiling process.
What is more unusual, is the way that the peels are removed from each syrup. What is unclear is whether a completely new syrup is made each time, or whether the existing syrup is simply made stronger, either by reducing it, or perhaps by adding more sugar. In the end, I opted to simply use the same syrup, but to boil it down between each stage.
For the stages, there are a series of instructions at the beginning of the book which describe each stage. A thin syrup is “will look thin & pale cullered.”[10] A full syrup is a bit stronger, “it will change its culler and looke high cullered like strong beere.”[11] It is not as strong as manus christi height, at which point it will form a thread between the fingers. Hess notes that this is 215F (105C), but this stage would normally be considered a bit hotter at 230-234F or 110-112C.[12]
Candy height, which is the final stage required for this recipe is what is now called the large pearl stage. Again, Hess’ temperature of 232F seems a bit low, it’s normally given as 235-239F or 113-115C.[13] Having said that, I have tried it with the temperatures that Hess gives, and they do work. You will just have a more syrupy peel at the end.
[1] Vehling, De Re Coquinaria of Apicius, 52; Palladius, The Fourteen Books of Palladius Rutilius Taurus Æmilianus, on Agriculture, 148; Richardson, Sweets, 92; The Korea Foundation, Traditional Food.
[2] Tolkowsky, Hesperides A History of Culture and Use of Citrus Fruits, 150, 166, 269.
[3] Redon, Sabban, and Serventi, The Medieval Kitchen: Recipe from France and Italy, 218.
[4] Scully, The Art of Cookery in the Middle Ages, 57.
[5] Anonimo Veneziano, “Libro Di cucina/Libro per Cuoco”; Faraudo de Saint-Germain, “Libre de Totes Maneres de Confits. Un Tratado Manual Cuatrocentista de Arte de Dulceria.”
[6] Young, “Stages of Sugar Syrup,” 102.
[7] Scully, The Art of Cookery in the Middle Ages, 130–31.
[8] Hess, Martha Washington’s Booke of Cookery and Booke of Sweetmeats, 278–87.
[9] Ibid., 284.
[10] Ibid., 226.
[11] Ibid.
[12] Ibid., 227; Young, “Stages of Sugar Syrup,” 651.
[13] Hess, Martha Washington’s Booke of Cookery and Booke of Sweetmeats, 227; Young, “Stages of Sugar Syrup,” 651.

Here is another still life with candied fruit. At the back left, the fruit has clearly been stored in syrup and is still quite wet. It’s hard to make out what the fruit is, but some pears, a lemon, and maybe some melon or gourd. On the plate on the right, the fruit is very dry. This could simply be dried fruit, but it could also be candied fruit. In particular, look in the center, where there is citrus peel holding the dried grapes. Georg Flegel [Public domain], via Wikimedia Commons
What can I do with my Orange Peel and Syrup?
The easiest thing is to eat it straight, because it is delicious. The recipe doesn’t call for it, but some people might like to roll the peel in sugar, or for a modern option you can dip them in good-quality dark chocolate.
You can also keep your orange peel for baking. Lots of modern recipes contain candied peel, including fruitcake, Christmas pudding, panettone or this delicious spiced honey cake. If you want something historical, try one of these recipes:
Eccles Cakes via The Old Foodie
Orange Gingerbread via The Old Foodie
Scotch Short-bread via the Old Foodie
Hot Cross Buns via The Cook and the Curator
Mince Pies via Colonial Williamsburg Historic Foodways
This updated recipe of Martha Washington’s Excellent Cake via the Chicago Tribune
Skirret Pie via Historic Food Jottings
And the syrup? It’s got a lovely, gentle orange flavour which would be perfect for pouring over baklava or awamat (Lebanese doughnuts). You could also use it as a simple syrup in cocktails, or use it for an orange syrup cake.
My Redaction
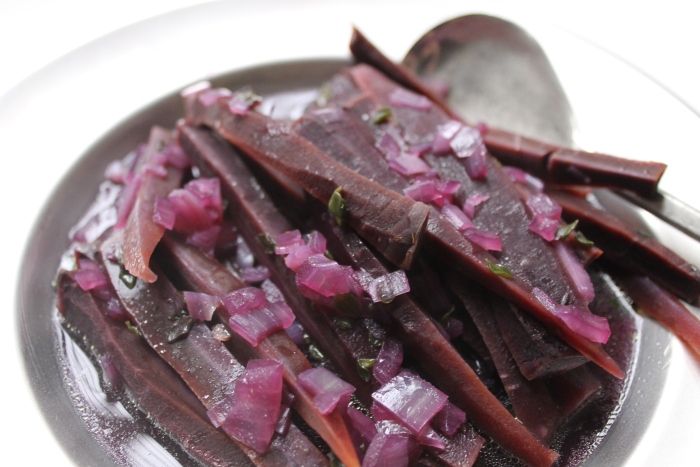
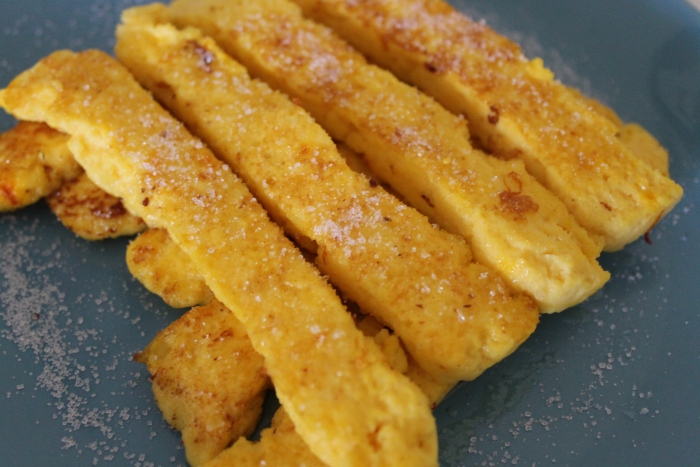
Candied Orange Peels
4 oranges, Seville if possible
2 cups water
225g sugar
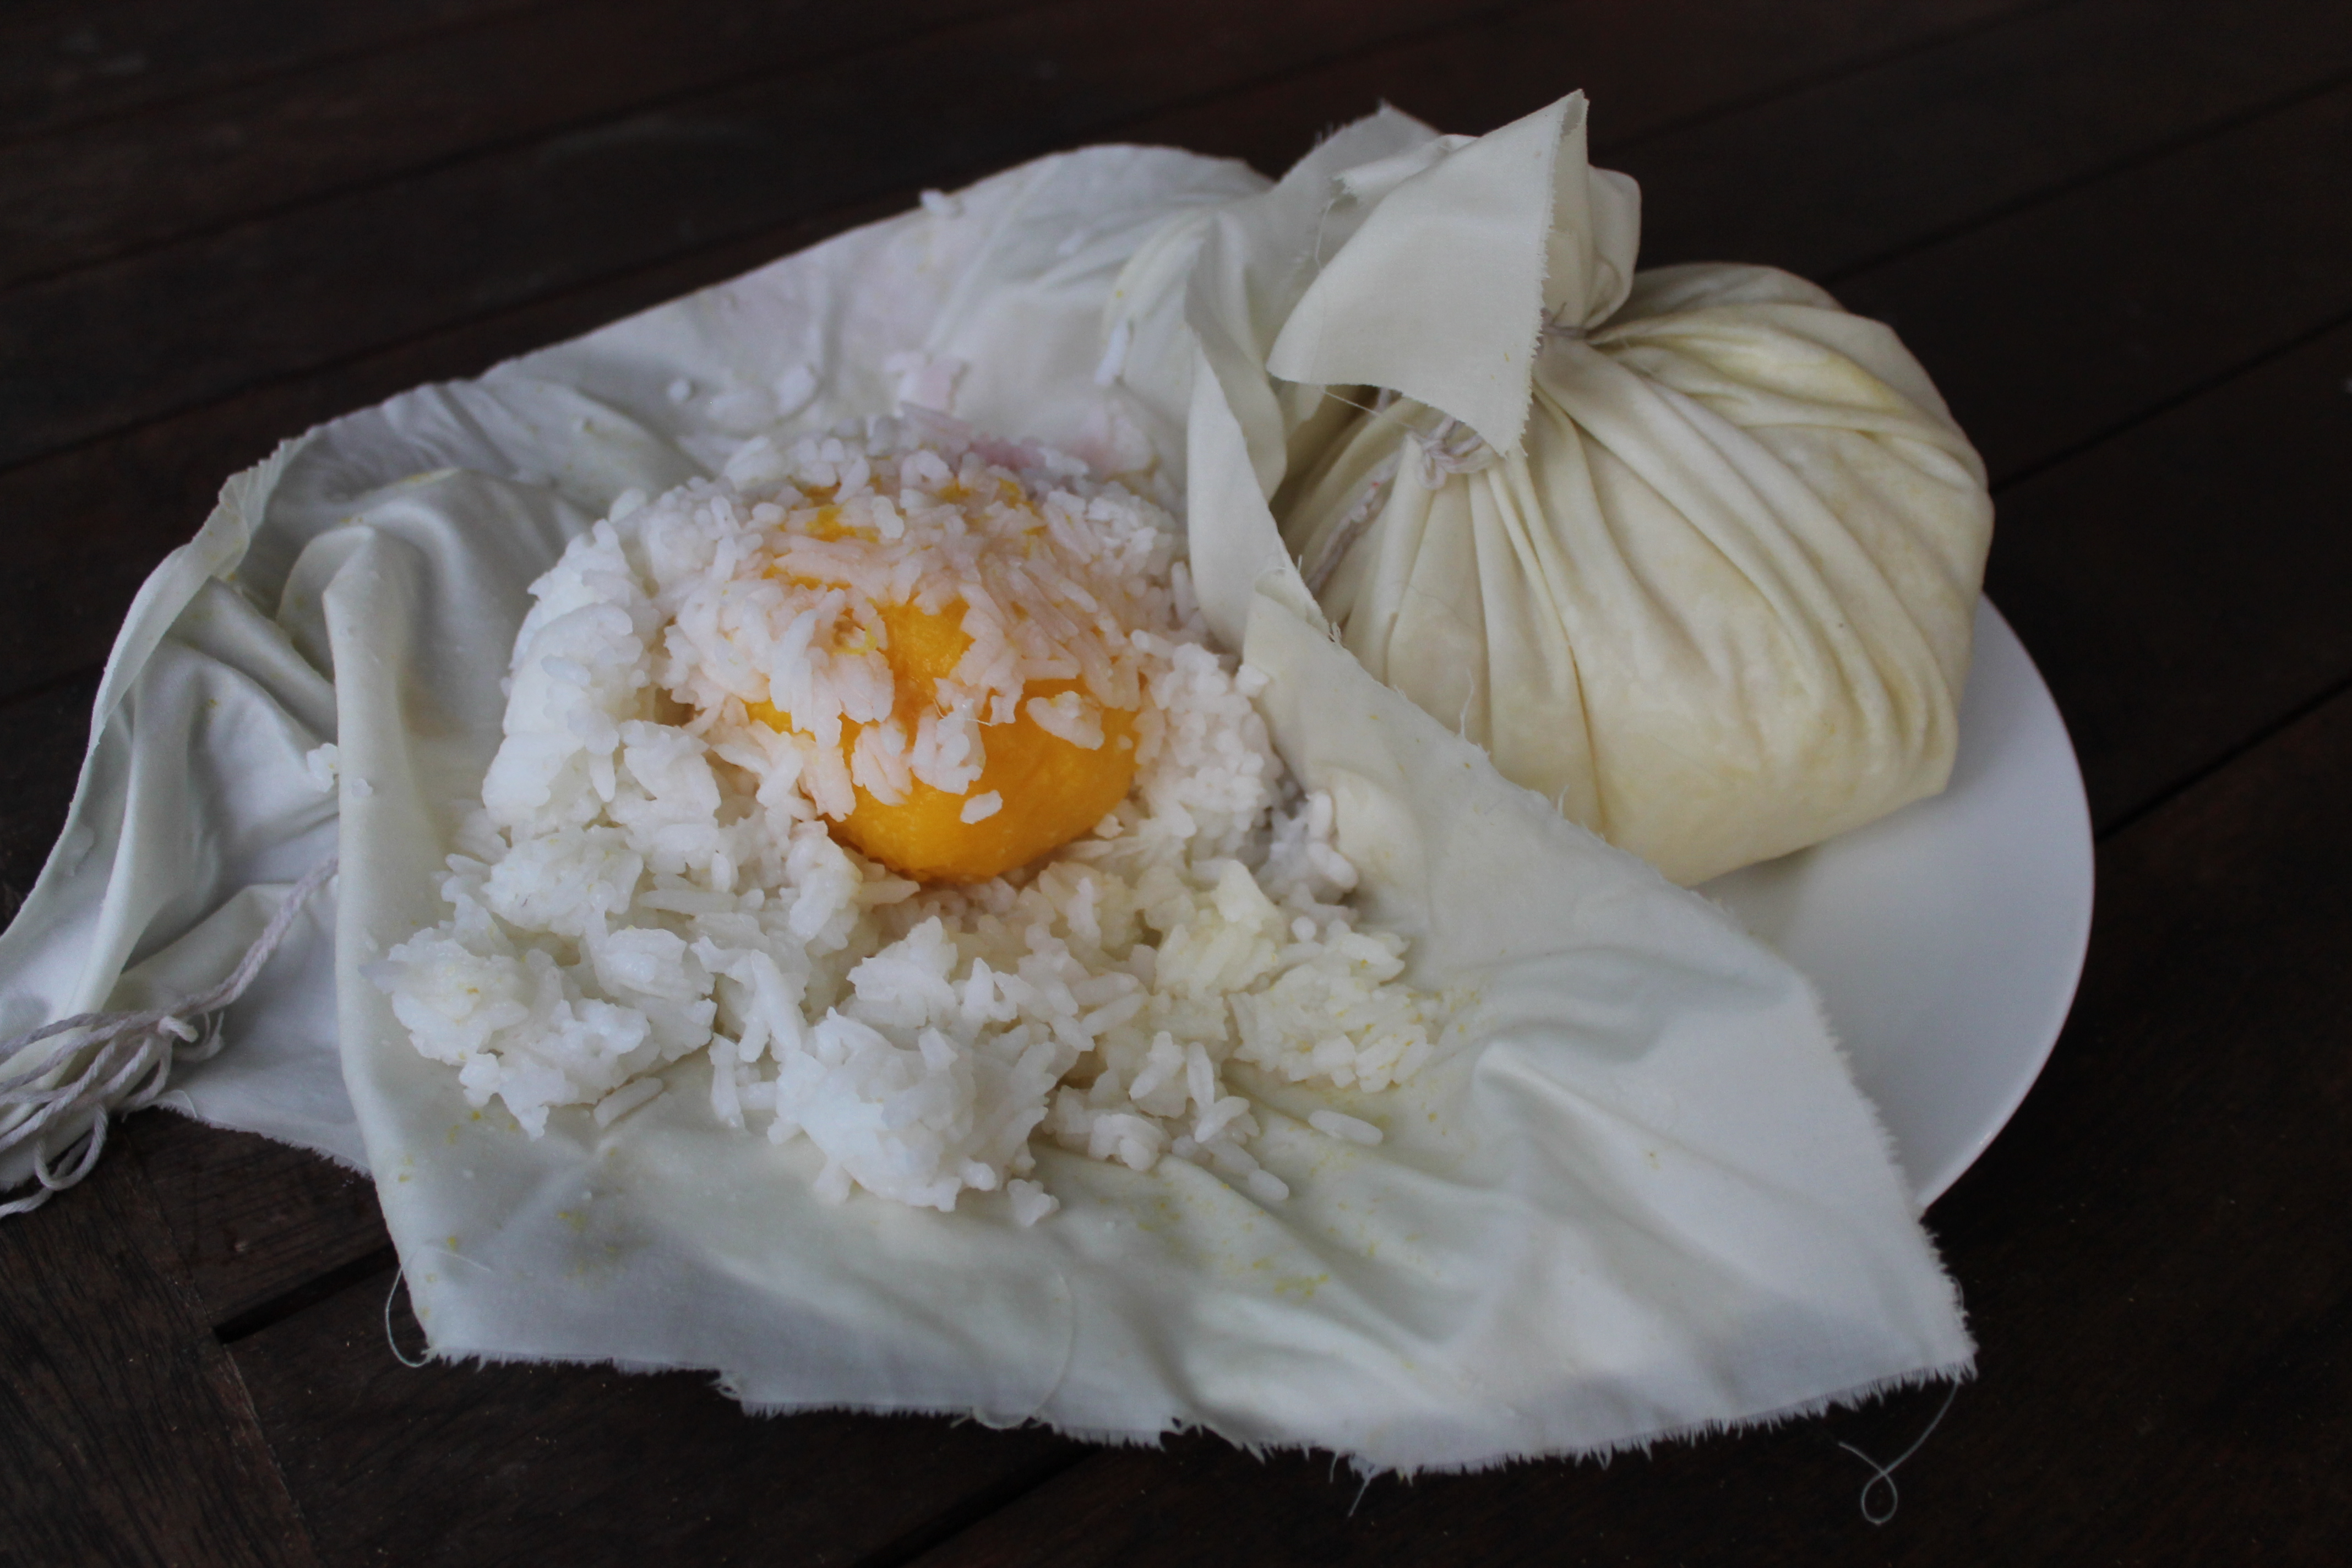
- Slice the top and bottom off the oranges with a very sharp knife. Steady the orange on the now flat bottom, and carefully cut the peel of the knife in vertical sections. Carefully remove as much pith as you want (more pith = more bitter) using either a teaspoon or a knife. Slice the peel into thin slices.
- Place the peel in a large bowl and cover with fresh water. Cover the bowl and leave for 24 hours, changing the water after 12 hours. The next day, drain the peels, place them in a medium saucepan and cover with cold water. Bring the water to the boil, then drain the peels, cover them in fresh water and bring to the boil again. Repeat this once more, for a total of three times, then drain the peels.
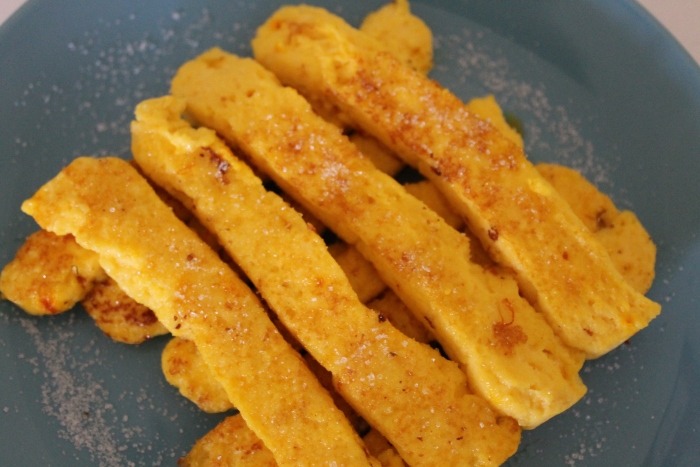
- In the saucepan, combine the water and the sugar. Heat over medium heat until the sugar is dissolved, then bring to a simmer. Add the peel, but try not to stir as this will lead to crystallisation. Simmer for 15 minutes, then remove the peel.
- Heat the syrup to 105C, then add the peel. Simmer for 15 minutes, then remove the peel.
- Heat the syrup to 113C,then add the peel. Simmer for 15 minutes, or until soft and translucent. Remove the peel from the hot syrup and lay them on racks to dry. Once dry, remove them and store them in an airtight container.
Note: you can collect orange peels over time, and keep them in a zip-lock bag in the freezer. Simply defrost them when you want to use them, and continue with the recipe. If they have been frozen, it is much easier to scoop out the pith with a spoon.
The Round-Up
The Recipe: To Candy Orring Pills from Martha Washington’s Booke of Cookery and Booke of Sweemeats
The Date: 17th century
How did you make it? See above.
Time to complete?: 2 days
How successful was it?: I was really happy with how they turned out. They’re very moreish wish a pleasant residual bitterness from the pith.
How accurate?: I didn’t use Seville oranges, which would have been more bitter, and might have needed more pith removed. I also am not sure whether using the same syrup and just making it stronger was the right approach or not.

References
The Korea Foundation. Traditional Food: A Taste of Korean Life. Seoul: Seoul Selection, 2010.
Anonimo Veneziano. “Libro Di cucina/Libro per Cuoco.” Translated by Thomas Gloning.
Corpus of Culinary & Dietetic Texts of Europe from the Middle Ages to 1800, 2000. http://www.staff.uni-giessen.de/gloning/tx/frati.htm.
Faraudo de Saint-Germain, Lluis. “Libre de Totes Maneres de Confits. Un Tratado Manual Cuatrocentista de Arte de Dulceria.” Boletin de La Real Academia de Buenas Letras de Barcelona 19 (1946): 97–134.
Hess, Karen. Martha Washington’s Booke of Cookery and Booke of Sweetmeats. Reprint edition. New York: Columbia University Press, 1996.
Palladius, Rutilius Taurus Aemilianus. The Fourteen Books of Palladius Rutilius Taurus Æmilianus, on Agriculture. Translated by Thomas Owen. J. White, 1807.
Redon, Odine, Francoise Sabban, and Silvano Serventi. The Medieval Kitchen: Recipe from France and Italy. Translated by Edward Schneider. Chicago & London: The University of Chicago Press, 1998.
Richardson, Tim. Sweets: The History of Temptation. Random House, 2004.
Young, Carolin C. “Stages of Sugar Syrup.” In The Oxford Companion to Sugar and Sweets, edited by Darra Goldstein, 650–53. Oxford: Oxford University Press, 2015.
Scully, Terence. The Art of Cookery in the Middle Ages. 5th ed. Suffolk and Rochester: Boydell Press, 2005.
Tolkowsky, S. Hesperides A History of Culture and Use of Citrus Fruits. London: John Bale Sons & Curnow LTD, 1938.
Vehling, Joseph Dommers, trans. De Re Coquinaria of Apicius. Chicago: Walter M. Hill, 1936. http://penelope.uchicago.edu/Thayer/E/Roman/Texts/Apicius/1*.html.


 This is just a quick post to get me back on track with the