An anti-miserabilist approach to historical cooking

Tag: Gluten free (page 2 of 3)

Pass the Pickled Eggs

So a couple of months ago, just before my birthday, I was talking about birthday presents with my cousin Ryan and his girlfriend. While my request for a penguin seemed perfectly reasonable, I was a bit surprised when he said that all he wanted for his birthday was some pickled eggs. When The Old Foodie posted a selection of historical pickled egg recipes a week later, it just seemed like the universe was sending me a message.
Fast forward several months and the week of his birthday I was not only ridiculously busy but also quite sick. I suppose I could have changed my mind and used a modern recipe with, you know, quantities and real instructions, but where is the fun in that? Oh and why just make one historical recipe when you can do two?

Girl with a Basket of Eggs by Joachim Beuckelaer (circa 1533–1575) [Public domain], via Wikimedia Commons

Girl with a Basket of Eggs by Joachim Beuckelaer (circa 1533–1575) [Public domain], via Wikimedia Commons

The Recipes

And so, although the process was not without hiccups, the eggs were pickled and enjoyed and I sat down to write this post. Actually I’ve tried a number of times, but each time I got side-tracked into doing more research. In spite of scouring dozens of cookbooks, I cannot find an older English recipe than the sage recipe which was posted by The Old Foodie and dates from 1725.

“Boil New laid Eggs in Vinegar, Cloves, Pepper, and a Handful of Sage-leaves, till hard, then peel them and put them into Glasses; when your Pickle is cold, put it to them, and cover them down close.”[1]

Sage Pickled Eggs, recipe from 1725

Since the pickled egg is a favourite among re-enactment groups I had just assumed that they were much older, and so apparently do lots of modern cookbook writers. These led me back to Dorothy Hartley’s book Food in England which says that, “When eggs are plentiful, farmers’ wives take four or six dozen newly laid, and boil them hard; then, taking off the shells, they place them in earthenware jars and pour upon them scalding vinegar well seasoned with pepper, allspice, ginger, and garlic. The eggs are fit to use after a month.”[2] She says this recipe comes from 1700 or thereabouts, although nearly identical recipes appear throughout the 19th century, the earliest version I can find is from 1844 in The Mechanic’s Magazine[3].

In fact pickled eggs are much older, just not in England. Going back further, there is a reference to pickled eggs in Andrew Boorde’s A Dyetary of Helth from about 1542 which says that:

“In Turkey, and other hyghe chrystyan landes anexed to it, they use to seth two or thre busshels of egges togither harde, and pull of the shels, & sowse them, and kepe them to eate at all tymes; but hard egges be slow and slack of dygestyon and doth nutryfye the body grosly.”[4]

Sousing is the process of preserving meat or animal parts in a pickle, so these are definitely pickled eggs. Boorde’s comment that these eggs come from Turkey and surrounding lands is interesting in light of a recipe from Kitab Wasf al-At’ima al-Mu’tada or The Description of Familiar Foods. A 14th century cookbook written in Arabic, possibly from Cairo, The Description of Familiar Foods includes the following recipe:

“Baid Mukhallal – Take boiled eggs and peel and sprinkle with a little ground salt and Chinese cinnamon [cassia] and dry coriander. Then arrange them in a glass jar and pour wine vinegar on them, and put it up.”[5]

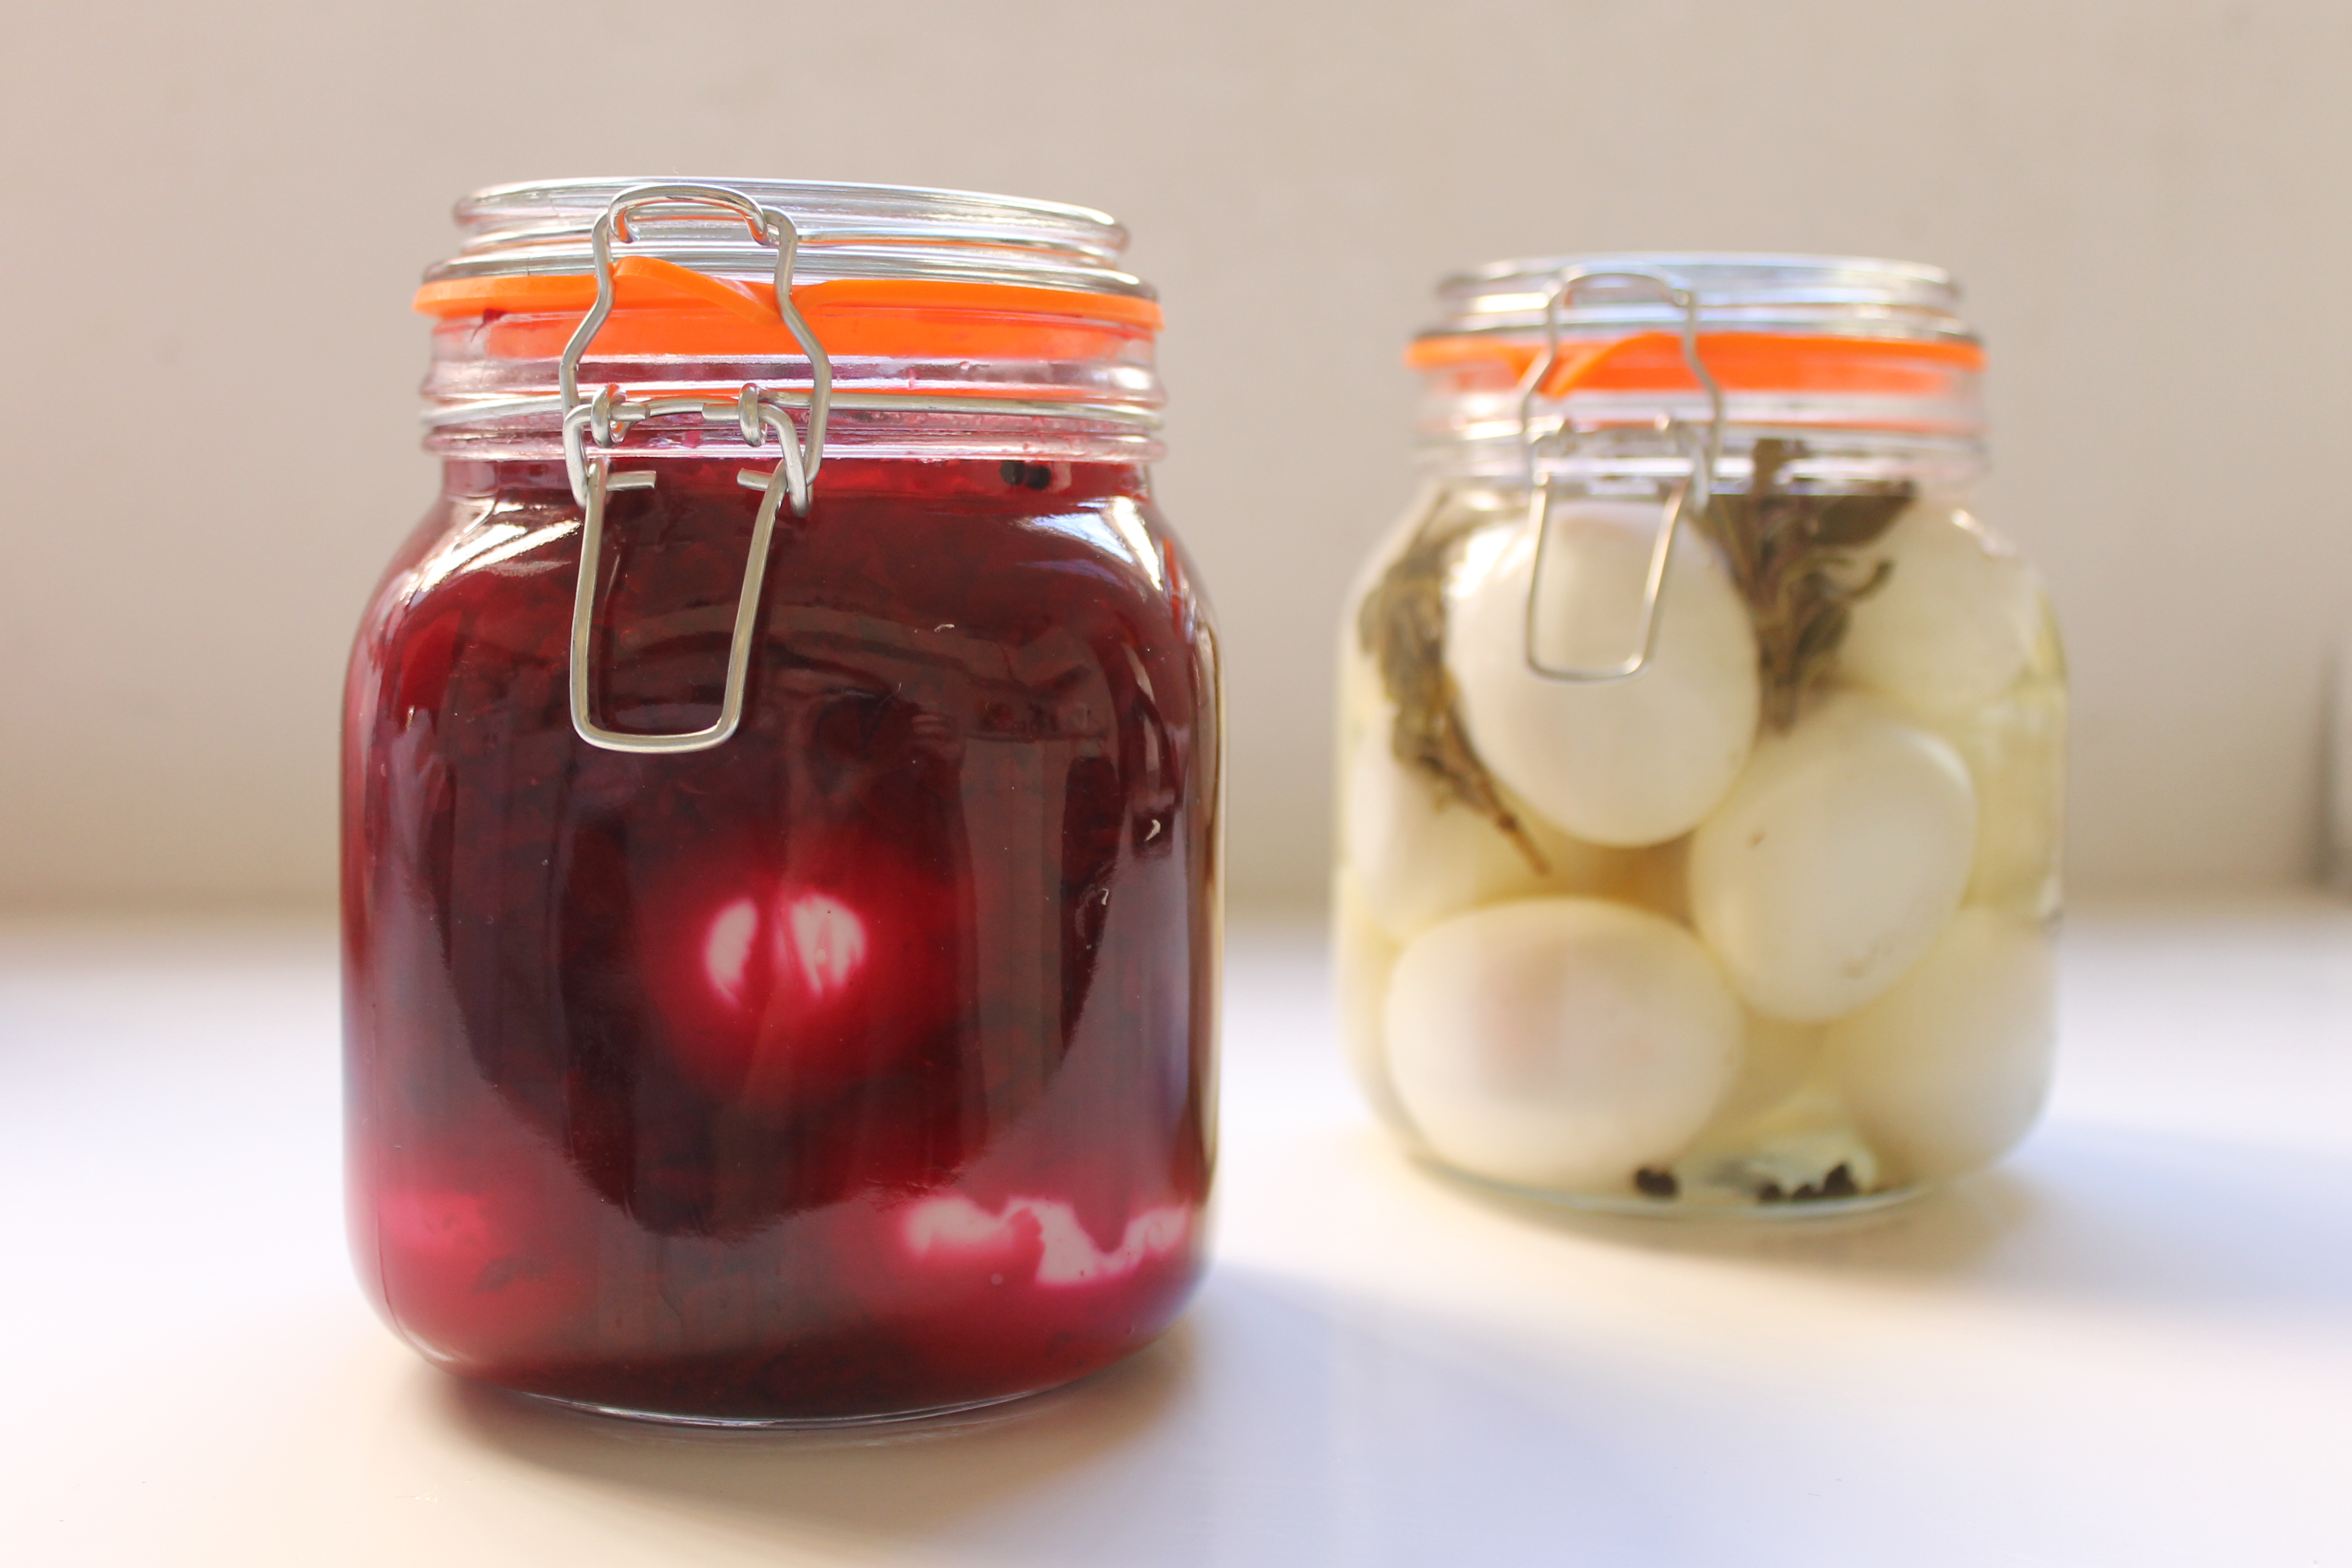
That’s definitely going to be the next pickled egg recipe I try, but I doubt that it will be as pretty as the second recipe that I made. Dyed pink with beetroot juice, this recipe comes from The Practical American Cook Book, Or, Practical and Scientific Cookery. The Old Foodie quoted an 1855 edition, but I have only been able to find an 1863 edition. Today these pink eggs are particularly associated with the Pennsylvania Dutch and they make a lovely addition to salads with their variegated colours.

Pickled Eggs. Boil them until hard; throw them hot into cold water, which will make the shell slip off smoothly after the eggs have remained in it about ten minutes; boil some red beets till very soft; peel and mash them fine, and put enough of the liquor into cold vinegar to color it pink; add a little salt, pepper, nutmeg, and cloves; put the eggs into a jar and pour the beets, vinegar &c., over them. This makes a pretty garnish for fish or corned meats. Cut the eggs in slices when used.[6]

Pink Pickled Eggs, Recipe from 1863

The Redactions

Safety Note: These are the quantities and processes that I used to make these recipes, but because the liquids are cold when poured over the boiled eggs there is a higher chance of bacterial growth than in modern pickled egg recipes. If you decide to try these recipes you should keep the eggs refrigerated and consume them within days of making them. You can also increase the safety heating the pickling liquid to boiling point and pouring it over the eggs. 

Sage Pickled Eggs

12 eggs

2 1/2 cups vinegar

3 cloves

1 tsp peppercorns

Small handful of sage

  1. Hard boil eggs, then allow to cool and shell them. Place into a sterilised jar.
  2. Mix the vinegar, spices and sage in a saucepan and just bring to the boil. Allow the liquid to cool and pour over the eggs.

Beet Pickled Eggs

12 eggs

1 beetroot, or use the whole, pre-boiled beetroots that you can sometimes find vacuum sealed

1tsp black pepper

1/2 tsp salt

1/2 cup normal vinegar

1/2 cup red wine vinegar

1/2 cup juice from beetroot

3 cloves

  1. Quarter the beetroot, place in a saucepan and cover in boiling water. Bring the pot to the boil and cook until the beetroot is soft, this takes longer than you would think, about 30 mins. When soft, remove the beetroot and allow the pieces to cool enough to handle. Peel the beetroot, then dice it and roughly mash the cubes.

2. Put the eggs into a saucepan, cover with water, bring to a rolling boil and simmer for 8 minutes. Allow to cool and peel.

  1. Place the eggs in a sterilised jar, then add the beetroot over the top. Mix the rest of the ingredients and pour over.

Pickled eggs, recipes from 1725 and 1863

The Round-Up

The Recipe: Pickled Eggs from Robert Smith’s Court Cookery: Or, The Compleat English Cook 128.(available here) and from The Practical American Cook Book by A Housekeeper (preview available here).

The Date:1725 and 1865

How did you make it?: See above.

Time to complete?: The beetroot took a very long time to cook, so those ones took over an hour and a half, but the sage ones were faster; including cooling time they probably took about an hour.

How successful was it?: I only tried the beetroot ones which were a beautiful colour, slightly rubbery but very pleasant. Ryan preferred the sage eggs, but that may be because he isn’t the biggest fan of beetroot.

How accurate?: I ended up changing the process of the sage eggs somewhat, because the first time that I made them I diluted the vinegar with water which would have changed the eggs preservative properties. The sage also through off a nasty scum when boiled like that. In the end I started again, boiling the eggs in water and then heating the other ingredients separately. The biggest difference in terms of ingredients is probably the type of vinegar used, but there was no indication of the type of vinegar in the recipes and I haven’t done enough research to really know what would have been used.

11911464_1059338284077547_633809302_n 11897045_1059338217410887_1619311519_n

[1] Robert Smith, Court Cookery: Or, The Compleat English Cook (London: Printed for T. Wotton, at the Three-Daggers in Fleet-Street, 1725), 128.

[2] Dorothy Hartley, Food in England (London: Little, Brown & Company, 1999), 345.

[3] Robertson, ed., Mechanics Magazine (London: James Bounsall, 1844), 352.

[4] Andrew Boorde, The Fyrst Boke of the Introduction of Knowledge Made by Andrew Borde, of Physycke Doctor. A Compendyous Regyment; Or, A Dyetary of Helth Made in Mountpyllier, ed. Frederick James Furnivall (London: Published for the Early English Text Society by N.T. Trubner & Co, 1870), 265.

[5] Charles Perry, “Kitab Wasf Al-At’ima Al-Mu’tada [The Description of Familiar Foods],” in Medieval Arab Cookery, by Maxime Rodinson, A.J Arberry, and Charles Perry (Totnes, U.K.: Prospect Books, 2001), 397.

[6] A Housekeeper, The Practical American Cook Book (New York: D Appleton and Company, 1863), 91.

And my penguin? He's already making friends.

And my penguin? He’s already making friends.

Bibliography

A Housekeeper. The Practical American Cook Book. New York: D Appleton and Company, 1863.

Boorde, Andrew. The Fyrst Boke of the Introduction of Knowledge Made by Andrew Borde, of Physycke Doctor. A Compendyous Regyment; Or, A Dyetary of Helth Made in Mountpyllier. Edited by Frederick James Furnivall. London: Published for the Early English Text Society by N.T. Trubner & Co, 1870.

Hartley, Dorothy. Food in England. London: Little, Brown & Company, 1999.

Perry, Charles. “Kitab Wasf Al-At’ima Al-Mu’tada [The Description of Familiar Foods].” In Medieval Arab Cookery, by Maxime Rodinson, A.J Arberry, and Charles Perry, 373–450. Totnes, U.K.: Prospect Books, 2001.

Robertson, ed. Mechanics Magazine. London: James Bounsall, 1844.

Smith, Robert. Court Cookery: Or, The Compleat English Cook. London: Printed for T. Wotton, at the Three-Daggers in Fleet-Street, 1725.

An Excellent Family Pudding of Cold Potatoes, with Eggs etc.

Potato pudding, recipe from 1861

Last year when I first started looking at recipes for the Historical Food Fortnightly I came across a recipe for Potato Cheesecake in The Antipodean Cookbook. This recipe, which has no cheese, no flour and doesn’t have instructions for baking, was unlike any other recipe I had come across. Having looked at a lot more cookbooks since then, I’ve found that there are actually quite a few similar potato recipes.

Potato Cheese Cake Ingredients: 3 or 4 boiled potatoes, 1 tablespoonful butter, 1 tablespoonful sugar, 2 eggs, grated peel and juice of 1 lemon, 2 teaspoonfuls brandy, and a few currants. Mode: Mash the 3 or 4 potatoes quite smooth. Melt the butter in a saucepan, and stir in the potato, the sugar, and eggs well beaten. Stir over the fire till it thickens, then add the grated peel and the lemon juice, the brandy, and lastly a few well-washed currants.[1]

These recipes were both sweet and savoury, sometimes baked in a pie case and sometimes without, and they lasted from at least the mid-18th century to the end of the 19th. It’s not hard to understand why these puddings would have been popular, they are basically all cheap starch, flavoured with relatively small amounts of more expensive ingredients – brandy, citrus fruits, currants, sugar, or a little spice. They are also quite an appetising way of using up left over boiled potatoes, The Family Save-All specifically recommends saving up the potatoes left from two or three days meals. I also quite like that it is recommended for children, “children of larger growth”, invalids and the elderly, i.e. everyone.

Potato pudding recipes from The House-Keeper’s Pocket-Book; And Compleat Family Cook pg. 115.

Potato pudding recipes from The House-Keeper’s Pocket-Book; And Compleat Family Cook pg. 115.

I was a bit suspicious of adding marmalade though, so in the end I went with the savoury version of the pudding and served it with gravy. I’ll have to come back when I’m feeling more adventurous and try one of the sweet recipes.

Potato pudding recipe form The Family Save-All, 1861, pg. 90.

Potato pudding recipe form The Family Save-All, 1861, pg. 90.

The Redaction

An Excellent Potato Pudding

6 large potatoes

4 eggs

568ml milk

Salt and pepper

  1. Heat the oven to 200˚C. Peel, chop and boil the potatoes if you aren’t using left over potatoes. Mash them well and stir in the beaten eggs and milk. Season well.
  2. Pour the mixture into a greased casserole dish and smooth the top or make patterns in it with a fork. Bake for 30-45 minutes, or until the top has formed a golden crust. Serve hot with gravy.

Potato pudding, recipe from 1861

The Round-Up

The Recipe: An Excellent Family Pudding of Cold Potatoes, with Eggs etc. from The Family Save-All by Robert Kemp Philp (available here, pg. 90)

The Date: 1861

How did you make it? See above.

Time to complete?: About an hour.

How successful was it?: It was hot, starchy and quite plain. It was a bit like eating very smooth mashed potatoes. It definitely needed more seasoning.

How accurate?: Pretty good, but I wasn’t sure if the instruction to add sugar was for both versions, or just the sweet version. In the end I didn’t add it, but that may have been the wrong choice.

[1] Mrs. Lance Rawson, Antipodean Cookery Book and Kitchen Companion, Facsimile of 2nd ed. (Kenthurst, NSW: Kangaroo Press Pty.Ltd, 1992), 34–35.

Bibliography

Harrison, Sarah. The House-Keeper’s Pocket-Book; And Compleat Family Cook. 4th ed. London: Printed for R. Ware, at the Bible and Sun on Ludgate-Hill, 1748.

Philp, Robert Kemp. The Family Save-All, a System of Secondary Cookery. By the Editor of “Enquire Within”. 2nd ed. London: W. Kent and co., 1861.

Rawson, Mrs. Lance. Antipodean Cookery Book and Kitchen Companion. Facsimile of 2nd ed. Kenthurst, NSW: Kangaroo Press Pty.Ltd, 1992.

Orange You Glad

Chicken with Orange SauceI felt that for the next Historical Food Fortnightly challenge, which was to make something with oranges, I wanted to do something that was a bit earlier in date. Flicking through ‘The Medieval Kitchen’ by Redon, Sabban and Serventi I stumbled across Chicken with Orange Sauce which sounded promising and was very budget friendly.

The recipe is a translation from Maestro Martino’s ‘Libro De Arte Coquinaria’ which was composed before 1465 (one of the versions is dedicated to his patron who died in that year).[1] Martino was the official cook for several important Italian gentlemen in the mid fifteenth century, and something of a celebrity chef. He was a part of an international network of courts that shared recipes and tastes, ‘De Arte Coquinaria’ shows affinities with Catalan manuscripts in particular.[2]

The Recipe

“Roast Chicken. To prepare roast chicken, you must roast it; and when it is cooked take orange juice or verjuice with rose water, sugar, and cinnamon, and place the chicken on a platter; and pour this mixture over it and send it to table.”[3]

What I soon discovered though, was that oranges in this period were not the sweet oranges which we are familiar with today. Originating in an area comprising north-eastern India, northern Myanmar and southern China, the bitter orange was brought to Europe via Islamic Spain.[4] Bitter oranges were used to give a sour taste to dishes, especially sauces, and could be used as an alternative to verjuice. Although there are some mentions of sweet oranges in the 15th century, it wasn’t until the 16th century that they were cultivated in Europe. It may be that it was the introduction of a new variety from China by Portugese traders that was the impetus for eating oranges as a fruit, rather than using them just for their sour juice (in much the same way as we use lemons today).[5] That the oranges called for in our recipe were bitter oranges is clear from the option to use verjuice instead.

By Franz Eugen Köhler, Köhler's Medizinal-Pflanzen (List of Koehler Images) [Public domain], via Wikimedia Commons

Citrus Aurantium by Franz Eugen Köhler, Köhler’s Medizinal-Pflanzen [Public domain], via Wikimedia Commons

As an interesting aside, one of the other results of the introduction of the orange was the invention of the colour ‘orange’. Mark Morton has pointed out that before the orange was being consumed in Europe, there were few things that were genuinely orange, and that anything that was orange-y could be described as ‘red’, ‘scarlet’ (both of which described a wider range of colours than now), ‘tawny’, or ‘brusk’.[6] It wasn’t until the 17th century that ‘orange’ was accepted as an adjective.

The Redaction

There are no quantities called for in the recipe, but as the authors of ‘The Medieval Kitchen’ provided a redaction of their own I saw no reason not to use their recipe, with one major exception. In the book, the authors say to use either bitter orange juice, or to use verjuice with rosewater. Having looked at the translation provided and, as much as possible with my basic Italian, the original recipe, I see no reason to read it as:

juice OR verjuice and rose water PLUS sugar and cinnamon

instead of:

juice OR verjuice PLUS rose water, sugar and cinnamon.

I also chose to add a bit of butter to the chicken, but that is a personal preference and you can certainly do as they suggest and use no fat. Of course, the original recipe calls for the chicken to be roasted, that is cooked in front of a fire, rather than baked in an oven, but if, like me, you don’t happen to have an open fire available then the oven will have to do.

Chicken with Orange Sauce from 'Libro de Arte Coquinaria'

Chicken with Orange Sauce

Adapted from ‘The Medieval Kitchen’ by Odile Redon, Francoise Sabban and Silvano Serventi.

1 chicken

Butter (optional)

Juice of 3 Seville oranges (or 2 sweet oranges and 1 lemon and omit the sugar) or 10 tbsp verjuice

1 tbsp rose water

1/2 tsp of sugar

1 pinch of ground cinnamon

  1. Pre-heat the oven to 200C. Place the chicken in a pan and, if desired, dot with pieces of butter. Bake until the chicken is golden and the juices run clear, basting frequently with the pan juices.
  2. Mix together the other ingredients in a bowl. Pour over the chicken and serve on a platter, or serve as a sauce with the chicken.

The Round-Up

The Recipe: Chicken with Orange Sauce from Maestro Martino’s ‘Libro De Arte Coquinaria’, translation in ‘The Medieval Kitchen’[7].

The Date: before 1465

How did you make it?: See above.

Time to complete?: The chicken took about an hour, the sauce itself was very quick.

How successful was it?: I liked the sauce, I was worried it would be very sweet but it wasn’t. It was a bit watery though, and I think it could have been even sourer. I would be interested to try it with Seville oranges if I can find them in season. It also made a lot of sauce for just one chicken, although it might not seem as much if you poured if over the chicken.

How accurate?: Well, I couldn’t get Seville oranges, I added a bit of butter, and I used an oven so it was really baked rather than roasted, so it could definitely be better.

Chicken with Orange Sauce from 'Libro de Arte Coquinaria'

[1] Nancy Harmon Jenkins, “Two Ways of Looking at Maestro Martino,” Gastronomica 7, no. 2 (2007): 97.

[2] Ibid.

[3] Odine Redon, Francoise Sabban, and Silvano Serventi, The Medieval Kitchen: Recipe from France and Italy, trans. Edward Schneider (Chicago & London: The University of Chicago Press, 1998), 115.

[4] Frederick G. Gmitter Jr. and Xulan Hu, “The Possible Role of Yunnan, China, in the Origin of Contemporary Citrus Species (Rutaceae),” Economic Botany 44, no. 2 (1990): 267–77; Clarissa Hyman, Oranges: A Global History (London: Reaktion Books, 2013), 7–13.

[5] Hyman, Oranges: A Global History, 13–17; Herbert John Webber, The Citrus Industry …, [1st ed]. (Berkeley, 1948), 12–14.

[6] Mark Morton, “Hue and Eye,” Gastronomica 11, no. 3 (2011): 6–7.

[7] Redon, Sabban, and Serventi, The Medieval Kitchen: Recipe from France and Italy, 115.

Bibliography

Gmitter, Frederick G., Jr., and Xulan Hu. “The Possible Role of Yunnan, China, in the Origin of Contemporary Citrus Species (Rutaceae).” Economic Botany 44, no. 2 (1990): 267–77.

Harmon Jenkins, Nancy. “Two Ways of Looking at Maestro Martino.” Gastronomica 7, no. 2 (2007): 97–103.

Hyman, Clarissa. Oranges: A Global History. London: Reaktion Books, 2013.

Morton, Mark. “Hue and Eye.” Gastronomica 11, no. 3 (2011): 6–7.

Redon, Odine, Francoise Sabban, and Silvano Serventi. The Medieval Kitchen: Recipe from France and Italy. Translated by Edward Schneider. Chicago & London: The University of Chicago Press, 1998.

Webber, Herbert John. “History and Development of the Citrus Industry.” In The Citrus Industry …, edited by Herbert John Webber, [1st ed]. Berkely: University of California Press, 1948.

Rotten as a Medlar

The next challenge for the Historical Food Fortnightly is to make something with a rare or scarce ingredients. Last October I was lucky enough to stumble upon a rather elusive fruit in a small French market. Called nèfles in French, medlars are very hard to come by in Australia, so I jumped at the opportunity to try these much maligned fruits.

A member of the rose family, medlars might look a bit like giant, brown rosehips but in texture they are more like their other relative, the quince. Like quinces medlars are extremely hard and sour, or at least until they are bletted. Bletting is the first step for basically any medlar recipe and involves leaving the fruit for several weeks to rot. The whole rotted fruit thing is part of the reason that the fruit has a bit of a bad name, but it’s also got centuries of bad nicknames (‘cul de chien’ in French, and an even more graphic one in English) and a history of sexual inneundo (Chaucer, Shakespear and D.H. Lawrence have all had a go at the poor medlar) to overcome. Don’t be put off though, for all its resemblance to certain anatomical features, the medlar is seeing a resurgence amongst foodies and for good reason too!

Some of the sites I read about bletting suggested putting the medlars in the fridge but I found that it was much faster to leave them out on the counter in a paper bag. It took a number of weeks and not all of the fruit ripened at the same time, you can arrest ripening by putting them in the fridge while you wait for the rest to be ready. They’re ready when they are wrinkled, soft and squishy, it’s not hard to tell. You can see the clear difference between the medlars before and after bletting in picture below.

IMG_1667

Once the medlars are bletted they can be eaten straight, just squeezed out of their skins but watch out for the seeds! I tried them like this and quite like the flavour which is similar to applesauce, but I didn’t like the texture which was quite grainy. With a carton of medlars to use up I turned to the historical cookbooks for directions. The most common way of using medlars seems to be as jelly which was particularly popular in the Victorian period, but other options include medlar tarts, medlar cheese or medlar preserves.

 The Recipe

This recipe comes from Foreign Desserts for English Tables which was published in 1862. The recipe is incredibly simple, can be applied to whatever quantity of medlars you have and makes a delicious jelly. It can be eaten like a jam, added to gravies and sauces or eaten with cheese as an alternative to quince paste, and it’s definitely worth a try if you can find some medlars!

Medlar Jelly, recipe from 1862

“Medlar Jelly – Pick over your medlars, choose them that are ripe but perfectly sound; halve them, and put them into a saucepan with the juice of a lemon and enough water to float them. Boil them until the water is reduced to a third of its original quantity. Mash the fruit in the liquor put it in a very fine sieve, and let the juice run through without using pressure. Take weight for weight of the latter and highly refined loaf-sugar, boil and skim it carefully, and when thick enough place it in your glass mould. This jelly should be beautifully clear when well made.”[1]

Now I don’t think its worth me giving a redaction, partly because I didn’t have scales in France when I made it and so don’t know what quantities I used, and partly because the original recipe is very straightforward. If you are concerned about using this recipe and want something with quantities you could use David Lebovitz’s recipe which is similar but adds an apple to up the pectin content (what helps the jelly set). The process for testing the jelly and bottling it is the same as for Transparent Marmalade.

 The Round-Up

The Recipe: From Foreign Desserts for English Tables (available here)

The Date: 1862

How did you make it? See above.

Time to complete?: 1hr 30.

How successful was it?:  Very nice indeed, a lovely translucent jelly with a rosy colour (it was less orange than it looks in the pictures).

How accurate?: Pretty good I think, with the exception of the sugar maybe?

Links

The Cook and the Curator on medlars and medlar cheese

Theodore Garrett’s Medlar Cheese

The Old Foodie on medlars and medlar tarts

 Medlar Jelly, recipe from 1862

[1] The Author of Everybody’s Pudding Book, Foreign Desserts for English Tables, by the Author of “Everbody”s Pudding Book’. (London: Richard Bentley, 1862), 147.

Bibliography

The Author of Everybody’s Pudding Book. Foreign Desserts for English Tables, by the Author of “Everbody”s Pudding Book’. London: Richard Bentley, 1862.

Got the Blues

Sky-Blue Sauce

This fortnight’s challenge “Something Borrowed, Something Blue” was one of the hardest challenges to find something to make. I really wanted to do something blue, but blue foods are always a bit thin on the ground. The exception seems to be the Middle Ages when a range of colourants were used to dye foods: saffron or egg yolk for yellow, alkanet, blood or berries for reds, ground toast or liver for browns and blacks, spinach or parsley juice for green and almond milk and chicken for white.[1] To make blue medieval cooks had a range of options: ground lapis lazuli (don’t try this at home!), cooked carrot peel, blackberries, cherry or grape juice, or the rather enigmatic turnsole[2].


Many of these ingredients were used in jellies or leaches (milk jellies) to produce fanciful, multi-coloured dishes. Another popular use was coloured sauces, The Medieval Kitchen: Recipes from France and Italy lists white, green, yellow, pink, black, blue and camel-coloured sauces.[3]


The Recipe


The pleasant-sounding ‘Sky-blue sauce for summer’ (I’ve also seen it translated as ‘heavenly’ which I think is even nicer) seemed promising. I don’t speak Italian so I used an English translation (from The Medieval Kitchen) but an Italian version is available here called ‘Sapor celeste de estate’.


“Sky-blue sauce for summer. Take some of the wild blackberries that grow in hedgerows and some thoroughly pounded almonds, with a little ginger. And moisten these things with verjuice and strain through a sieve.”[4]


Unfortunately, as you may have guessed from the pictures there was a major problem with my version, it’s not blue. To add insult to injury, it also tastes pretty awful (it somehow managed to be both too watery and too sour at the same time). Because of these rather major faults I won’t be giving a redaction (if you want to try it you can find the redaction from the book here). I used similar proportions, although I halved the recipe and used slightly less verjuice. I do wonder if that was the problem, although having had a look at some other blogs it seems that no-one has really succeeded at turning the recipe blue, let alone “a lovely midnight-blue”[5].

Sky-Blue Sauce

The Round-up

The Recipe: Sky-blue sauce for summer from Libro de Arte Coquinaria by Martino de Rossi (available here in Italian)

The Date: c. 1465

How did you make it?: I mashed 2 cups of blackberries then added the 2 tbsp of ground almonds, 1/2 tsp of ground ginger and 1/4 cup of verjuice before straining the mixture.

Time to complete?: About 20 mins.

How successful was it?: Well it didn’t turn blue and didn’t taste good so it failed on pretty much all counts. Whether the taste was correct but just not my thing I’m not sure. As to not turning blue, I wonder if either I didn’t add enough verjuice or it wasn’t acidic enough. Epulario by Giovanne Roselli has a nearly identical recipe but he uses mulberries instead, would this work better?

How accurate?: I wonder what medieval verjuice was like, something to investigate further.


[1] Terence Scully, The Art of Cookery in the Middle Ages, 5th ed. (Suffolk and Rochester: Boydell Press, 2006), 114–116.

[2] Turnsole is a dyestuff that yields a colour that varies from red to purple to blue depending on the PH level of the liquid it is mixed with. It has been identified as several different plants, although the most likely is chrozophora tinctoria.

[3] Odine Redon, Francoise Sabban, and Silvano Serventi, The Medieval Kitchen: Recipe from France and Italy, trans. Edward Schneider (Chicago & London: The University of Chicago Press, 1998), 165–178.

[4] Ibid., 168.

[5] Ibid.


Bibliography

Redon, Odine, Francoise Sabban, and Silvano Serventi. The Medieval Kitchen: Recipe from France and Italy. Translated by Edward Schneider. Chicago & London: The University of Chicago Press, 1998.


Scully, Terence. The Art of Cookery in the Middle Ages. 5th ed. Suffolk and Rochester: Boydell Press, 2006.

A Lemon Blancmange

Lemon Blancmange, recipe from 1861

First of all, apologies that it’s been a while, between exams, moving and Christmas its been a bit crazy but better late than never. The challenge this time was “Fear Factor”, no not the TV show but a dish, technique or ingredient that strikes fear into your very heart. For me the obvious answer was calves foot jelly, a moulded jelly made by boiling calves feet for hours to extract the gelatine. Between the ick factor, the sheer amount of effort involved and the scariness of unmoulding a jelly, I’m sure you can understand why this dish has me shaking in my boots.

Unfortunately (or fortunately?) I seriously underestimated how difficult it would be to find calves feet. Thinking about the recipe again though, I realised that the part that really strikes fear into my heart is setting and unmoulding the jelly, and that can certainly be done without extracting my own gelatine. If however you are really keen to learn about calves feet jelly, the amazing blog The Cook and the Curator has a great video about making it from scratch.

The recipe I decided to use comes from Mrs. Beeton’s The Book of Household Management and is for a Lemon Blancmange. Blancmange is a dish with a very long history, but has become almost unrecognisable over time. It’s a staple of medieval and Victorian cookbooks, whether as a white soup made of shredded chicken and almond milk, or an elaborate jelly set with isinglass.

The Recipe

LEMON BLANCMANGE. 1442.

INGREDIENTS.— 1 quart of milk, the yolks of 4 eggs, 3 oz. of ground rice, 6 oz. of pounded sugar, 1-1/2 oz. of fresh butter, the rind of 1 lemon, the juice of 2, 1/2 oz. of gelatine.

Mode.— Make a custard with the yolks of the eggs and 1/2 pint of the milk, and, when done, put it into a basin: put half the remainder of the milk into a saucepan with the ground rice, fresh butter, lemon-rind, and 3 oz. of the sugar, and let these ingredients boil until the mixture is stiff, stirring them continually; when done, pour it into the bowl where the custard is, mixing both well together. Put the gelatine with the rest of the milk into a saucepan, and let it stand by the side of the fire to dissolve; boil for a minute or two, stir carefully into the basin, adding 3 oz. more of pounded sugar. When cold, stir in the lemon-juice, which should be carefully strained, and pour the mixture into a well-oiled mould, leaving out the lemon-peel, and set the mould in a pan of cold water until wanted for table. Use eggs that have rich-looking yolks; and, should the weather be very warm, rather a larger proportion of gelatine must be allowed.

Time.— Altogether, 1 hour. Average cost, 1s. 6d. Sufficient to fill 2 small moulds. Seasonable at any time.[1]

Lemon Blancmange, recipe from 1861

The Redaction

Mrs Beeton’s Lemon Blancmange

4 cups of milk

4 egg yolks

85g ground rice

170g sugar

43g butter

The rind of 1 lemon, peeled

Juice of 2 lemons

14g powdered gelatine
Note: Every time you go to place milk in the saucepan wet it with water first.

  1. Place 1 cup of milk in a saucepan and bring it to a slow simmer. In a large bowl whisk the 4 egg yolks together. Slowly whisk the hot milk into the egg yolks until it is all incorporated. Place the mixture back into the saucepan and cook on a low heat, stirring constantly until it thickens into a custard*.
  2. Place another 1 1/2 cups of milk into the saucepan with the ground rice, half the sugar, the butter and pieces of lemon rind. Boil for 5-10 minutes or until it is stiff and holds its shape. Stir this mixture into the custard.
  3. Place the remaining 1 1/2 cups of milk into the saucepan. Sprinkle the gelatine over the milk and allow it to dissolve. Turn on a low heat and stir until dissolved before bringing it to the boil for 1 minute. Add this and the remaining sugar to the custard.
  4. Allow the mixture to cool before adding the lemon juice and removing the lemon peel. Pour the mixture into moulds greased with a flavourless oil and leave in the fridge to set. To remove place the mould in very hot water for 30 seconds, but don’t let the blancmange get wet, and just loosen the edge to break the vacuum. Carefully turn the blancmange out onto a plate. If it does not come out of the mould return it to the hot water for another 30 seconds before trying again.

*If the mixture is lumpy with bits of egg just sieve them out.


The Recipe: Lemon Blancmange from The Book of Household Management (available here)

The Date: 1861

How did you make it? See above.

Time to complete?: 45 mins to make it, several hours to set.

How successful was it?: It was delicious! Creamy, firm and not too sweet, it even turned out of the mould well, after a couple of anxious moments. I served it with a simple raspberry coulis of frozen raspberries, water and sugar cooked and mashed together.

How accurate?: I’m not sure what type of gelatine the original recipe would have used (powdered, leaf, liquid?) or how finely ground the rice should be but it seemed to work. I also set it in the fridge rather than in a bowl of cold water because the weather was too warm for that.

[1] Isabella Beeton, ed., Beeton’s Book of Household Management (London: S.O Beeton, 1861), rec. 1442.

Bibliography

Beeton, Isabella, ed. Beeton’s Book of Household Management. London: S.O Beeton, 1861.

Flat Fruit

The next challenge for the Historical Food Fortnightly is “Ethnic Foodways” and given that I’m in France I thought this was a great opportunity to explore the history of some of the local specialities. Well, I have to report mixed results. The modern sources all seem to be quoting each other, and even if you can discover what the original source was, that’s no guarantee that it is an any way accessible (my Latin is non-existent and $300 first edition cookbooks are a little out of my price-range). Nonetheless, I think I have been able to pin down enough to give you a bit of a glimpse into two local specialities (the second is coming soon).

First up, pommes et poires tapées or dehydrated, flattened apples and pears. They might not sound too appetising at this point, but they’re actually not all that different from the dried apple rings you can buy in the supermarket. Drying fruit to preserve it is a time-honoured tradition, going all the way back to prehistory. In France, archaeologists interpret pieces of carbonised fruit dating to the late Iron Age as evidence of dried fruits.[1] Jumping forward a bit but staying surprisingly close geographically, in 1560 the king’s physician Jean Bruyérin-Champier referred to pears and apples which were dried in ovens around Orleans and Tours.[2]

Pommes tapéesBy the beginning of the 18th century, a rather unusual technique had developed with whole fruits (apples, pears and peaches) being dried in the oven for several days, and gently pressed with a wooden implement to flatten them. It is widely believed that fruit dried in this way was a staple for sailors, and that the flattening was to make them more space-efficient on ships. The industry expanded over the next hundred years, and in 1878 the region was exporting some 500,000 kg of dried fruit, but the glory days of  pommes tapées weren’t to last. Refrigeration and cheap imported fresh fruit took their toll and production nearly stopped in the 20th century, only starting up again in the ‘80s.[3]

Michel Albin explains that there are certain features of the ‘traditional’ technique

  1. Plants aren’t watered while growing to give naturally drier fruit.
  2. The wood fire oven is heated for three days and three nights to infuse the bricks with heat.
  3. The temperature is held between 60 and 90˚C for up to four days, being brought back up to temperature as necessary.
  4. The fruits are pressed one by one (sometimes with a platissoire).
  5. The fruit is then returned to the oven for a final drying period.[4]

Pommes tapées


Historical sources, however, show quite a lot of variation in the methods used to dry the fruit. Some fruit is dried whole, some is cored and/or peeled first. Some is blanched before drying, some dipped in a sugar syrup flavoured with their own peel and yet others are sprinkled with sugar. To flatten them you can use a special implement called a platissoire, press them with the palm of your hand, squash them between your fingers or as in the recipe below with a wooden bat.

This recipe is from La nouvelle cuisinière bourgeoise published in 1817:

“Pelez des pommes très-seines, des reinettes ou autres ; avec une spatule creusé, extirpez-en le cœur ; mettez-les ensuite sur des claies, assez distantes les unes des autres, pour qu’elles ne se touchent pas ; mettez vos claies au four ; le lendemain, les pommes sont assez séchées pour que vous puissiez les taper avec une batte de bois ; remettez-les sur les claies ; faites chauffer le four modérément ; puis remettez-y vos pommes jusqu’à lendemain ; recommencez a les taper ; remettez-les de nouveau au four, jusqu’à ce qu’elles aient acquis le degré de sécheresse nécessaire ; puis mettez-les dans des boites, dans un endroit très-sec.”[5]

(Peel unblemished apples, Reinettes or another type. With a hollow spatula (apple-corer) remove the cores; then place them on racks far enough apart so that the apples aren’t touching one another, and place your racks in the oven. The next day, the apples should be dry enough for you to flatten them with a wooden bat, then put them back onto the racks. Bring the oven to a moderate heat and return the apples to the oven overnight, then begin to press them again. Place them in the oven once again until they have reached the right degree of dryness. Then pack them into boxes and store in a very dry place.)

But having spent three days heating your oven and four drying the apples or pears, how are you going to enjoy the fruits of your labour? Well don’t worry because you have between 3 and 10 years to decide, assuming the fruit was well dried. Nowadays the back of the packet recommends eating them as a snack, rehydrating them in liquid (e.g. wine, tea or cider) or incorporating them into your favourite sweet and savoury dishes (think pork roast with apples or a fruity tagine). You can also buy a variety of secondary products: jam, terrines, wine, fruit in wine, brandy or syrup, or pastries with a fruity filling.

Pommes tapées in Mulled Wine


As to how they were enjoyed historically, well that’s where I hit a bit of a brick wall. The one clear reference I found is from 1856 and says to enjoy them as a dessert, cooked in wine and sugar.[6] To be really historically correct, I suppose you would have to stop there. But. Considering that they are now enjoyed in a spiced, wine syrup, generally using spices which have been available in France for centuries, and because it’s coming up to Christmas, I decided to rehydrate the apples that I had bought in what is basically mulled wine.

And if you don’t have a wood-fired brick oven/four days/any desire to make your own? You can order pommes et poires tapées and assorted variations on them here or here. Another option would be to try something similar with dried apple rings, which aren’t as tough and chewy, but would give you a similar experience. This recipe makes a warming, spiced dessert which would be perfect served in crystal glasses on a cold winter’s night.

Pommes tapées in Mulled Wine


1 bottle of red wine, pretty much any type will do but you will have to adjust the sugar to taste

Sugar, probably between 1/4 and 1/2 a cup depending on the wine and how you like it

125g of pommes tapées, about 10 dried apples.

2 cinnamon sticks

3-4 cloves

Half an orange, sliced


  1. Place all the ingredients in a saucepan and bring to a low simmer. Simmer for 30 mins or until the apples have swollen and are soft. Serve hot.

Pommes tapées in Mulled Wine

The Recipe: Extrapolated from a reference in Bulletin de L’instruction Primaire : Journal D’éducation et D’enseignement, (available here)

The Date: 1856

How did you make it? See above.

Time to complete?: 30 mins.

How successful was it?:  Quite chewy, but really very tasty. I think it make a lovely winter dish, and it smells just like Christmas!

How accurate?: Well, I think it’s a combination that is possible, but without an actual recipe it’s very hard to tell.

Links

An English recipe for pommes tapées is available here

A French recipe for wine made from dried pears is available here

And to dry your own pears you could try this recipe (also in French)

[1] Benedicte Pradat, “L’économie Agro-Pastorale Dans Le Loiret À L’âge Du Fer (du Hallstatt Ancien À La Tène Finale) : Synthèse Des Données Carpologiques,” Revue Archéologique Du Centre de La France 49 (2010): 132.

[2] Michel Albin, “Pommes Tapées,” in L’inventoire Du Patrimoine Culinaire de La France, Région Centre – Produits Du Terroir et Recettes Traditionelles (France: Editions Albin Michel, 2012), 227.

[3] Ibid.

[4] Ibid., 228.

[5] Cousin d’avallon, La Nouvelle Cuisinière Bourgeoise, 4th ed. (Paris: Chez Davi et Locard, Pigoreau et Philippe, 1817), 248.

[6] A Y, “Économie Rurale et Domestique: Conservation et Préparation Des Fruits,” Bulletin de L’instruction Primaire : Journal D’éducation et D’enseignement, Aout 1856, sec. Vo. 3, No. 16, 126.

Bibliography

Albin, Michel. “Pommes Tapées.” In L’inventoire Du Patrimoine Culinaire de La France, Région Centre – Produits Du Terroir et Recettes Traditionelles, 226–28. France: Editions Albin Michel, 2012.

Cousin d’avallon. La Nouvelle Cuisiniere Bourgeoise. 4th ed. Paris: Chez Davi et Locard, Pigoreau et Philippe, 1817.

Pradat, Benedicte. “L’économie Agro-Pastorale Dans Le Loiret À L’âge Du Fer (du Hallstatt Ancien À La Tène Finale) : Synthèse Des Données Carpologiques.” Revue Archéologique Du Centre de La France 49 (2010): 103–61.

Y, A. “Economie Rurale et Domestique: Conservation et Préparation Des Fruits.” Bulletin de L’instruction Primaire : Journal D’education et D’enseignement, Aout 1856, sec. Vo. 3, No. 16.

In a Jelly

Lemon Jelly, recipe from 1748

This is just a quick extra post, following up on my promise for the In a Jam challenge to provide the recipe for Lemon Jelly which I made. I had a surplus of lemons and as I was researching marmalade recipes for the challenge a couple of weeks ago I came across several rather intriguing recipes for Lemon Jelly.

It’s a jelly in the American sense of the word, as in a spreadable preserve rather than a semi-solid, wobbly dessert. In preserving terms, the use of jelly instead of jam means that it is made from the juice of the fruit, rather than the pulp which makes jellies much smoother but less efficient than jams. Typically in a jelly the fruit is cooked to release the juices, then strained through muslin for several hours to separate the juice from the pulp. The juice is then re-cooked with sugar until it reaches the setting point before being poured into hot jars.

These recipes are quite unusual, however, because two of them contain egg-whites.[1] Beacause of the difficulty in interpreting the recipe which I used, and because I would like to try the other recipes first, I have not given a redaction, but if you would like to try making the jelly it should be easy enough to follow my steps with the quantities given.

The House-Keeper’s Pocket-Book and Compleat Family Cook (4th ed. 1748 available as a PDF here) by Mrs. Sarah Harrison of Devonshire offers three recipes for Lemon Jelly (like the marmalade it is served in glasses as part of the dessert course).


The first recipe:

“TAKE five large Lemons and squeeze out the Juice, and beat the Whites of six Eggs very well; put to it twenty Spoonfuls of Spring Water, and ten Ounces of double-refin’d Sugar beat and sifted; mix all together, and strain it through a Jelly Bag, and set it over a gentle Fire, with a bit of Lemon-peel in it; stir it all the while, and skim it very clean; when it is as hot as you can bear your Finger in it, take it off, and take out the Peel, and pour your Jelly into Glasses.”[2]


The second recipe:

“TAKE three large Lemons, or four small ones, cut them in half, and take out all the Meat, and put it into a silver Pot; put as much Water as the Skin of your Lemons will hold into them, and let them stand three quarters of an Hour; then take the Whites of four Eggs, beat them very well, and let them stand till the Froth is fallen, strain your Lemons upon a Pound of double-refin’d refin’d[sic] Sugar broke into Lumps, let it stand till it is quite melted, then put in your Eggs well skimm’d being first strain’d through a thin Cotton Cloth; stir it till it will jelly, and take out your Peel before you put it in the Dish. You must see that your Lemons be free from Spots, or else your Jelly will not be white.”[3]


The third recipe:

“TAKE the best Lemons without Seeds, peel off the Rinds, and put the Meat in Quarters, having a Care of breaking the Skins; then take their Weight in double-refin’d Sugar, put your Sugar into a silver Bason [sic], and put it upon the Fire with as much Water as will wet it, and stir it till it comes to a clear Syrup; in the mean Time you must have your Lemon Quarters in another silver Dish upon the Fire, with as much Water as will keep them wet, and let them boil till they are tender; then put them into the Bason [sic] of Syrup, and set them on a soft Fire to heat, but not boil; as soon as ever they begin to simmer the least that can be, take them off, and shake them, and let them not be on the Fire again till they are pretty cold (for if they boyl they are spoil’d); and so continue setting them on and off till the Syrup will jelly; and then either put up the Jelly by itself in Glasses, and put the Quarters on a glass Sheet to dry, or on a Slieve [sic] in the Sun, or glass the Quarters and the Jelly all together, for they will do well both Ways.”[4]

Lemon Jelly, recipe from 1748

My Process

I used the second recipe which calls for three large or four small, spotless lemons. I cut them in half and spooned out all the pulp that I could. I placed the pulp into a saucepan, filled each half lemon with water and poured the water into the saucepan. I then left this to stand for 45 mins.


Whilst waiting for the pulp to be ready, I beat the whites of four eggs. This for me was the main problem with the recipe, it sounds like you beat the eggs to peaks and then allow them to drop, but does that even work? Or do you just beat it until slightly foamy? I beat it until I had foamy, very soft peaks on top, but after standing for a while there was also liquid underneath. On reflection I think it would be better to whisk it until it was a bubbly liquid, but maybe it is possible to allow it to drop by leaving more time.


Having beaten my eggs I strained the lemon pulp through muslin onto 450g of sugar with a piece of lemon peel (this is mentioned later in the recipe to be removed so I think it’s just missing the instruction to add it in). After gently stirring the mixture over a low heat until the sugar was dissolved I then added the egg whites by straining them through muslin into the saucepan. This is where it quickly became apparent that they were too well whipped. The liquid was easily incorporated into the jelly, as was some of the froth but most was not and had to be skimmed off the top of the jelly. I then cooked it until it reached setting point, removed the piece of lemon peel and poured it into dessert glasses.


Given what seemed to be an awful mistake, the jelly turned out remarkably well. It was one of the most delicious preserves I’ve ever eaten with a flavour similar to lemon-sorbet and the most delightful, effervescent texture. It felt light and bubbly on the tongue, an effect which I think must be because of the egg whites. It really was like Spring for the palate!

Lemon Jelly, recipe from 1748


Harrison, Sarah. The House-Keeper’s Pocket-Book; And Compleat Family Cook. 4th ed. London: Printed for R. Ware, at the Bible and Sun on Ludgate-Hill, 1748.


[1] Warning: If you are in an ‘at risk’ group (babies, toddlers, pregnant women, elderly people or the immune-compromised) for raw egg please don’t try the recipes containing raw egg.

[2] Sarah Harrison, The House-Keeper’s Pocket-Book; And Compleat Family Cook, 4th ed. (London: Printed for R. Ware, at the Bible and Sun on Ludgate-Hill, 1748), 148.

[3] Ibid., 148–149.

[4] Ibid., 149.

In a Jam

Marmalade Cropped more

After discussing the origins of the word marmalade several weeks ago (you can read the post here) the answer to this fortnight’s challenge “In a Jam” seemed obvious. You may remember that the original marmalade was actually a thick, quince paste which was imported from Portugal at the very end of the 15th century. Soon English confectioners and housewives were making their own version of the sweetmeat, using not only quinces but also apples, peaches, plums, damsons, pears and medlars.[1] Early recipes for orange marmalade hark back to these fruit pastes, Sir Hugh Platt’s book Delightes of Ladies published in 1602 has a recipe for ‘Marmelade of Lemmons or Orenges’ which is essentially a flavoured apple past while Gervase Markham in his book Country Contentments published in 1615 offers an orange marmalade which is strained into boxes, suggesting it was much thicker than what we would normally consider marmalade.


Sweetmeat Glass. 1750, Bohemian. Glass. via www.metmuseum.org

Sweetmeat Glass. 1750, Bohemian. Glass. via www.metmuseum.org

The earliest known recipe for marmalade in its modern form was written down by Rebecca Price in 1681, it was her mother’s recipe for a spoon-able jelly with shredded rind. Another early recipe is held by the Scottish Archives, it dates to 1683 and was probably written down by the Countess of Sutherland. You can see a copy of the recipe here, but be warned it is nearly illegible. In published recipe books the change didn’t occur until slightly later, in 1714 with the publication of Mary Kettilby’s A Collection of above Three Hundred Receipts.

Sweetmeat Glass. ca. 1740, German. Glass. via www.metmuseum.org

Sweetmeat Glass. ca. 1740, German. Glass. via www.metmuseum.org


Jellied marmalades, as opposed to cut marmalades which were the thick pastes popular until the end of the 18th century, came in two basic types: beaten or pounded and transparent. The difference is to do with the treatment of the peel, in a pounded marmalade the peel was pounded together with the pulp giving a cloudy jelly while transparent jellies were a clear jelly containing chips or finely cut strips of peel. Both types were served with the dessert course, alongside a range of other sweetmeats including ice creams, jellies, biscuits, nuts, fresh fruit, flummeries, creams, syllabubs and cakes. Wet sweetmeats like marmalade were served in salvers and ornate sweetmeat dishes, such as those pictured.


The dishes were laid out in symmetrical patterns on the table, arranged around an ornate centrepiece or pyramid of sweets. Hannah Glasse’s advice for young ladies arranging the table is as follows:

“The above middle frame [the centerpiece] should be made either in three parts or five, all to join together, which may serve on different occasions; on which suppose gravel walks, hedges, and variety of different things, as a little Chinese temple for the middle, or any other pretty ornament; which ornaments are to be bought at the confectioners, and will serve year after year; the top, bottom, and sides are to be set out with such things as are to be got, or the season of the year will allow, as fruits, nuts of all kinds, creams, jellies, whip syllabubs, biscuits &c. &c. And as many plates as you please according to the size of the table. All this depends wholly on a little experience, and a good fancy to ornament in a pretty manner; you must have artificial flowers of all sorts, and some natural out of a garden in summer time do very intermixed.”[2]

A later edition of the same book shows exactly how the dishes should be laid out[3]:


A bill of fare for the dessert course from The Compleat Confectioner by Hannah Glasse, 1800.

A bill of fare for the dessert course from The Compleat Confectioner by Hannah Glasse and Maria Wilson, 1800.


The Recipe


Like many recipes books of the time, Elizabeth Raffald’s The Experienced English House-keeper (1769) included recipes for both pounded and transparent marmalade. I used the recipe for Transparent Marmalade as follows:


“TAKE very pale Seville Oranges, cut them in Quarters, take out the Pulp, and put it into a Bason, pick the Skins and Seeds out, put the Peels in a little Salt and Water, let them stand all Night, then boil them in a good Quantity of Spring Water ‘till they are tender, then cut them in very thin Slices, and put them to the Pulp, to every Pound of Marmalade, put a Pound and a half of double refined Sugar beat fine, boil them together gently for twenty Minutes; if it is not clear and transparent, boil it five or six Minutes longer, keep stirring it gently all the Time, and take Care you do not break the Slices; when it is cold, put it into Jelly or Sweetmeat Glasses, tie them down with Brandy Papers over them.

They are pretty for a Desert of any Kind.”[4]


Although at first glance I thought that this recipe was quite similar to modern marmalade recipes, there were a couple of things that tripped me up. First was what to do with the pulp, I cut the oranges into quarters and then removed the peel from the flesh, however that left a lot of membrane on the flesh. I think there are probably two options for what you could do here, either do as I did and leave them more or less intact during the cooking process and then removing the membrane when the flesh has cooked down to a pulp. The other option would be to supreme the oranges which probably gives a slightly better result, but is a lot fiddlier.

The second question that I had to answer was what to do with the pith of the orange. Once again there are two basic options, leave it on because there are no specific instructions in the recipe, or after the peels have boiled you can use a spoon to scrape out the soft white pith. Basically the choice depends on how bitter you want your marmalade to be, with more pith making it more bitter, and on how exactly you want to follow the recipe. Since I’m not a huge fan of bitter marmalade, and because I thought it would make for a clearer jelly, I chose to remove the pith.

Transparent Marmalade

Transparent Marmalade in the foreground, and Lemon Jelly in the background. I’ll be posting a recipe for it soon!


Which brings us to the final, and probably most controversial issue. Seville oranges. To make this recipe properly you need Seville oranges. However, if you are like me and have a sudden compulsion to make marmalade with no Seville oranges to hand then don’t panic! Warning, I’m now going to say something that is worthy of excommunication in some circles, nonetheless I stand by the fact that you can make perfectly good marmalade with sweet oranges. It will be neither as intense nor as bitter as marmalade made from Seville oranges, but then in my book that’s not necessarily a bad thing. So if you can’t get Seville oranges/don’t want to, don’t be afraid to do as I did and use sweet oranges.


The Redaction

Mrs Raffald’s Transparent Marmalade

1 kg oranges

1 tsp salt

Sugar


  1. Quarter the oranges and pulling gently at one corner of the quarter, peel the skin from the flesh. If you would prefer to supreme the oranges see the link above but try to keep the peel in large pieces. Place the peels in a bowl with the salt and cover with cold water. Place the flesh in another bowl in the refrigerator, removing all the seeds that you can find, and leave both bowls overnight.
  2. The next day drain the peels, place them in a saucepan and cover them with fresh water. Bring to the boil and boil until a skewer will easily pass through the peels. Drain.
  3. Once the peels are slightly cooled take a spoon and scrape the white pith from the inside of the peels. Discard the pith then slice the peels into thin slivers, the thinner the better.
  4. Add the sliced peels to the pulp and weigh the mixture. Place the fruit in a saucepan and to every 450g of fruit add 680g of sugar. Bring to the boil and boil for 20 mins, mashing the fruit gently so that you can remove the membranes which can simply be lifted out and discarded.
  5. After 20 mins check the set of the marmalade by turning off the heat and placing half a teaspoonful on a cold saucer. If the marmalade separates into a jelly surrounded by a thinner liquid then it needs more time. You should be able to run your finger through the marmalade (but be careful it’s hot!), leaving a distinct channel with a wrinkled surface (if you’re not sure exactly how to test for a set there is a video link at the bottom of the page). If it is not setting then return it to the heat and cook for another 5 minutes before testing again. Continue until you reach setting point.
  6. Once you have reached setting point the marmalade can either be decanted into hot, sterilised jars to keep for several months, or into clean sweetmeat bowls if you want to serve it as a dessert.


IMG_0011

The Recipe: Transparent Marmalade from The Experienced English House-keeper by Elizabeth Raffald (available here)

The Date: 1769

How did you make it?: See above

Time to complete?: Probably about 1hr ½ active work, plus leaving it overnight.

Total cost: Maybe $3 for the oranges which I got on special and then the same for the sugar so $6 all up.

How successful was it?: Very tasty, just a hint of bitterness. One of my loyal taste-testers said it was the best marmalade she had ever had.

How accurate?: Well, I didn’t use Seville oranges, and I really need to look into what sugar was like at the time, but I’d say it was probably quite different. I had to make some decisions where the directions were unclear and it’s hard to tell how much that affected the authenticity but I’d say it was a decent approximation.


Marmalade Links

Learn how to supreme an orange here

Watch how to test for a set in jam here 

IMG_0017

[1] C. Anne Wilson, The Book of Marmalade (Great Britain: Prospect Books, 2010), 28–41.

[2] Hannah Glasse, The Compleat Confectioner (London: Printed and sold at Mrs. Ashburner’s China Shop, the Corner of Fleet Ditch; at Yewd’s Hat Warehous, near Somerset Hous; at Kirk’s Toyshop, in St Paul’s Church Yard; at Deard’s Toyshop, facing Arlington-Street, Piccadilly; By I. Pottinger, at the Royal Bible, in Pater-Noster Row; and by J Williams, opposite St. Dunstan’s Church, Fleet Street, 1760), 255.

[3] Hannah Glasse and Maria Wilson, The Complete Confectioner: Or, Housekeeper’s Guide: To a Simple and Speedy Method of Understanding the Whole Art of Confectionary; the Various Ways of Preserving and Candying, Dry and Liquid, All Kinds of Fruit, Nuts, Flowers, Herbs, &c. … the Different Ways of Clarifying Sugar … Also the Art of Making Artificial Fruit … To Which Are Added Some Bills of Fare for Deserts for Private Families (J. W. Meyers, 1800), 232.

[4] Elizabeth Raffald, The Experienced English House-Keeper: For the Use and Ease of Ladies, House-Keepers, Cooks, &c. : Wrote Purely from Practice and Dedicated to the Hon. Lady Elizabeth Warburton … : Consisting of Near 800 Original Receipts, Most of Which Never Appeared in Print … (J. Harrop, 1769), 201.

[1] Hannah Glasse and Maria Wilson, The Complete Confectioner: Or, Housekeeper’s Guide: To a Simple and Speedy Method of Understanding the Whole Art of Confectionary; the Various Ways of Preserving and Candying, Dry and Liquid, All Kinds of Fruit, Nuts, Flowers, Herbs, &c. … the Different Ways of Clarifying Sugar … Also the Art of Making Artificial Fruit … To Which Are Added Some Bills of Fare for Deserts for Private Families (J. W. Meyers, 1800), 232.

Bibliography

Glasse, Hannah. The Compleat Confectioner. London: Printed and sold at Mrs. Ashburner’s China Shop, the Corner of Fleet Ditch; at Yewd’s Hat Warehous, near Somerset Hous; at Kirk’s Toyshop, in St Paul’s Church Yard; at Deard’s Toyshop, facing Arlington-Street, Piccadilly; By I. Pottinger, at the Royal Bible, in Pater-Noster Row; and by J Williams, opposite St. Dunstan’s Church, Fleet Street, 1760.

Glasse, Hannah, and Maria Wilson. The Complete Confectioner: Or, Housekeeper’s Guide: To a Simple and Speedy Method of Understanding the Whole Art of Confectionary; the Various Ways of Preserving and Candying, Dry and Liquid, All Kinds of Fruit, Nuts, Flowers, Herbs, &c. … the Different Ways of Clarifying Sugar … Also the Art of Making Artificial Fruit … To Which Are Added Some Bills of Fare for Deserts for Private Families. J. W. Meyers, 1800.

Raffald, Elizabeth. The Experienced English House-Keeper: For the Use and Ease of Ladies, House-Keepers, Cooks, &c. : Wrote Purely from Practice and Dedicated to the Hon. Lady Elizabeth Warburton … : Consisting of Near 800 Original Receipts, Most of Which Never Appeared in Print … J. Harrop, 1769.

Wilson, C. Anne. The Book of Marmalade. Great Britain: Prospect Books, 2010.

The Pudding Bag – A Revelation


England has been famous for its puddings for centuries, and the word is now interchangeable with dessert, but it wasn’t always so. Historically puddings were essentially sausages with a filling stuffed into the stomach or intestines of an animal (the word probably comes from the Anglo-Norman word bodin meaning entrails)[1]. Sometimes they were kind of like dumplings, cooked in the broth with the meat for dinner.


Some of these types of puddings have survived into modern times e.g. black pudding, white pudding and haggis, but many others fell by the wayside because there are several main problems with this technique. Firstly, the ick factor. Secondly, processing the intestines is time consuming and, if not done properly, can make people very sick. Thirdly, fresh entrails are only available when you have slaughtered an animal and even then the quantity is limited.


The result of all this was that sometime in the late 16th or early 17th century realised there was a better way – the pudding cloth! Instead of slaughtering an animal and then spending hours, if not days, soaking and cleaning the intestines all the home chef had to do was butter and flour a piece of tightly woven cloth (calico is ideal). It was easier, faster and a lot less messy, plus the cloth can be re-used over and over again.


The earliest pudding boiled in a cloth that I’m aware of is in John Murrell’s ‘A New Booke of Cookerie’ from 1615. His recipe for a Cambridge Pudding contains breadcrumbs, flour, dates, currants, nutmeg, cinnamon, pepper, suet, milk, sugar and eggs and most importantly, it’s boiled in a cloth.[2] This however is the only pudding which he recommends using a cloth for, the other boiled puddings are all made in guts or cauls and he offers one fried pudding and one Italian baked pudding. By 1671 though napkins, bags and cloths were much more popular, used in 26 of Robert May’s recipes for puddings.[3]


Image taken from page 23 of 'Recollections of Old Christmas: a masque. Performed at Grimston. [By Thomas C. Croker.]' Courtesy of the British Library.

Image taken from page 23 of ‘Recollections of Old Christmas: a masque. Performed at Grimston. [By Thomas C. Croker.]’ Courtesy of the British Library.

Boiled puddings continued to be popular well into the Victorian era, but over time most puddings have also become sweeter (with a few exceptions such as haggis, see here for a sweet haggis recipe). At first they were starch, offal or maybe meat spiced up with a little dried fruit and some cinnamon but by the Victorian period the only reminder of most puddings’ savoury heritage was the suet. Others were based on eggs, such as the popular Quaking Pudding which I chose to make this week, it’s essentially a boiled egg custard with breadcrumbs or flour to keep it together.


The Recipe


Take a pint of good cream, six eggs, and half the whites, beat them well, and mix with the cream; grate a little nutmeg in, add a little salt, and a little rosewater, if it be agreeable; – grate in the crumb of a halfpenny roll, or a spoonful of flour, first mixed with a little of the cream, or a spoonful of the flour of rice, which you please. Butter a cloth well, and flour it; then put in your mixture, tie it not too close, and boil it half an hour fast. Be sure the water boils before you put it in.[4]


I chose to use Hannah Glasse’s recipe for Quaking Pudding (available here) because I was intrigued by the use of rice flour, which conceivably means it could be made gluten free. The only issue with that is flouring the cloth, for which I used normal flour but I imagine it could be done either with gluten free plain flour or possibly with rice flour.


In the end, the pudding was easy to put together but took a lot longer to boil than the recipe said. Setting up the saucepan etc is also a bit of a faff if you don’t just happen to have a copper boiling for wash day. To top it all off, I found the taste extremely plain and rather eggy, although some of my taste-testers enjoyed its simplicity. To make it a little more interesting I made a quick sauce based on aside on Ivan Day’s site which says it was frequently served with a sauce of melted butter, sugar and rose-water.[5] It helped a bit. If after that glowing endorsement you would still like to try it, my version of the recipe is below.

Quaking Pudding, recipe from 1774


The Redaction


Quaking Pudding


3 eggs

3 egg yolks, extra

2 cups cream

1/4 nutmeg, grated

1 1/2 tbsp rosewater

Pinch of salt

1 tbsp rice flour

20-30g butter

A couple of tbsp of flour

Slivered almonds to decorate


For the sauce:

30g butter, melted

2 tbsp caster sugar

1 tbsp rosewater


You will also need a large piece of unbleached cotton or calico (wash well in hot water prior to use), kitchen string and a very large saucepan.


  1. Fill the saucepan with water and bring to a rolling boil.
  2. Take the eggs and extra egg yolks and beat them with the cream. Stir in the grated nutmeg, rosewater and the salt. Add 1 tbsp rice flour and whisk till smooth.
  3. Lay the clean cloth on a flat surface and rub the butter into the cloth, squidging it in with your fingers to make a waxy barrier. Spread the flour over the buttered cloth, then carefully lift the cloth into a round bottomed bowl.
  4. Pour the mixture into the cloth. Gather the edges of the cloth and tie tightly, leaving a bit of room for the mixture to expand. Place gently into the boiling water and boil for 60 mins.
  5. Using tongs, carefully remove the pudding from the water. Cut the string and very gently unwrap the pudding. If as you begin to unwrap the pudding you find that it is still liquid you will need to carefully retie the string and boil the pudding for longer.
  6. To make the sauce mix the melted butter, sugar and rosewater together. Stud the pudding with the almonds and serve with the sauce.


The Recipe: Quaking Pudding from The Art of Cookery, Made Plain and Easy by Hannah Glasse (available here)

The Date: 1774

How did you make it? See above.

Time to complete?: 25 mins to put it together and 60 mins to boil.

Total cost: About $6 for the cream and the rosewater. Everything else was in the cupboard.

How successful was it?: It did turn out which was one of the things that I was worried about, but it took a lot longer to cook than the recipe indicated. The taste, however, was very bland and very eggy so not that great.

How accurate?: Pretty accurate, although I used thickened cream instead of plain cream which wasn’t ideal.

IMG_2226

[1] “Pudding, N.,” OED Online (Oxford University Press), accessed September 6, 2014, http://www.oed.com.ezproxy2.library.usyd.edu.au/view/Entry/154127.

[2] John Murrell, A Nevv Booke of Cookerie VVherein Is Set Forth the Newest and Most Commendable Fashion for Dressing or Sowcing, Eyther Flesh, Fish, or Fowle. Together with Making of All Forts of Iellyes, and Other Made-Dishes for Seruice; Both to Beautifie and Adorne Eyther Nobleman or Gentlemans Table. Hereunto Also Is Added the Most Exquisite London Cookerie. All Set Forth according to the Now, New, English and French Fashion. Set Forth by the Obseruation of a Traueller. I.M., 1615th ed., Early English Books, 1475-1640 / 1146:17 (London: Printed for Iohn Browne, and are to be solde at his shop in S. Dunstanes Church-yard, 1615), 37.

[3] KM Wall, “May Pudding Baggage,” Pilgrim Seasonings, May 21, 2013, http://blogs.plimoth.org/pilgrimseasonings/?tag=quaking-pudding.

[4] Hannah Glasse, The Art of Cookery, Made Plain and Easy: Which Far Exceeds Any Thing of the Kind Yet Published … (W. Strahan, J. and F. Rivington, J. Hinton, 1774), 219.

[5] Ivan Day, “Some Interesting English Puddings,” Historic Food, N.D, http://www.historicfood.com/English%20Puddings.htm.


Bibliography


Day, Ivan. “Some Interesting English Puddings.” Historic Food, N.D. http://www.historicfood.com/English%20Puddings.htm.

Glasse, Hannah. The Art of Cookery, Made Plain and Easy: Which Far Exceeds Any Thing of the Kind Yet Published … W. Strahan, J. and F. Rivington, J. Hinton, 1774.

Murrell, John. A Nevv Booke of Cookerie VVherein Is Set Forth the Newest and Most Commendable Fashion for Dressing or Sowcing, Eyther Flesh, Fish, or Fowle. Together with Making of All Forts of Iellyes, and Other Made-Dishes for Seruice; Both to Beautifie and Adorne Eyther Nobleman or Gentlemans Table. Hereunto Also Is Added the Most Exquisite London Cookerie. All Set Forth according to the Now, New, English and French Fashion. Set Forth by the Obseruation of a Traueller. I.M. 1615th ed. Early English Books, 1475-1640 / 1146:17. London: Printed for Iohn Browne, and are to be solde at his shop in S. Dunstanes Church-yard, 1615.

“Pudding, N.” OED Online. Oxford University Press. Accessed September 6, 2014. http://www.oed.com.ezproxy2.library.usyd.edu.au/view/Entry/154127.

Wall, KM. “May Pudding Baggage.” Pilgrim Seasonings, May 21, 2013. http://blogs.plimoth.org/pilgrimseasonings/?tag=quaking-pudding.


css.php