An anti-miserabilist approach to historical cooking

Tag: Australia (page 1 of 2)

A 1930s Picnic

picnic table with cake and sandwiches and crackers

Photo by Lucas Garron

Back in California and with another wave of COVID-19, this year’s birthday was a quiet one with a 1930s themed picnic. For food, I leaned pretty heavily on the recipes from my Gatsby Picnic a few years ago but I swapped in a couple of new dishes (and of course a birthday cake) which I wanted to share.

Once again, all the recipes come from the amazing resource that is the database of fully searchable Australian newspapers on Trove.


First up, a new sandwich filling: cream cheese and gherkin from The Argus in 1936.


Use brown bread, spreading one side only with cream cheese mixed with very finely chopped gherkins.


This is as simple as can be to make, and definitely an unusual combination to get your guests in the 30s mood but also not bad.


macaroni salad in a plastic container

Picnic Macaroni Salad from The Townsville Daily Bulletin in 1939

3 cups cooked macaroni, 1 ½ cups diced celery, 1 ½ cups diced cucumber, 3 tablespoons minced onion, 2 tablespoons minced parsley, 3 tablespoons chopped capsicum, 1 teaspoon salt, mayonnaise

Mix the ingredients in the order given, adding just enough mayonnaise to bind. Chill thoroughly before leaving for the picnic. If a wide-mouthed thermos jug is used, be sure that it is well chilled beforehand. Cover the salad with waxed paper and lay crisp lettuce leaves on top before closing the jug tightly. This recipe makes 6 servings.

Note: You don’t need much mayonnaise at all, but I did end up increasing the salt because it was a bit bland. I actually really liked this which was a good thing because it definitely served more than 6.


pie in a pie dish on a checkered tablecloth

Tasty Pie from the Manjimup Mail and Jardee-Pemberton-Northcliffe Press in 1934


Such a very tasty but easy to make pie is made by mixing some diced ham or bacon with two or three well-beaten eggs and a very little milk, seasoning well and pouring on to a deep plate lined with pastry. Put another layer of pastry over the top and bake in a moderate oven until lightly browned. This is particularly easy to carry, and can be cut into conveniently sized sections to eat in the fingers if cutlery is not carried.


Note: This was a hit with my guests and was great served cold with some salad.


Tasty Pie

3 eggs

4 rashers bacon, diced

Salt and pepper (or use something like Adobo seasoning for a bit of extra flavour)

¼ cup milk

2 disks puff pastry


Beat together the eggs, diced bacon, milk and seasoning. Line a pie plate with one of the disks of puff pastry, then pour in the filling. Top with the second disk of puff pastry and bake at 200°C until puffed and browned.

cake covered in pineapple rings with cherries in the center of the rings

Pineapple Wheel Cake from The Richmond River Herald and Northern Districts Advertiser in 1932

This was selected as the prize winning recipe of the week in Brisbane: Melt ½ cup of butter in cake tin, cover with 2 cups brown sugar, spreading it evenly. Place 1 slice of tinned or fresh pineapple (cored) in centre of tine, on top of sugar; cute several other slices of pineapple in half, arranging them in circle round the centre slice, like the spokes of a wheel, rounded edges facing one way. If desired, fill in spaces with walnuts and cherries. Make sponge batter, using 4 eggs, 1 cup sugar, 1 cup flour, 1 teaspoonful baking powder, or self-raising flour. Pour over the pineapple wheel and bake in a moderate oven for 10 or 15 minutes. Turn out on plate upside down, and when cold spread with whipped cream.


Pineapple Wheel Cake

7 slices cored pineapple (fresh or tinned)

Maraschino/glacé cherries and/or walnuts

½ cup butter

2 cups brown sugar

4 eggs

1 cup sugar

1 cup flour

1 tsp baking powder


  1. Heat the oven to 180°C. Place the butter in a 24cm/9 1/2 inch springform round tin sitting on top of a baking tray (because the butter will leak). Put the cake tin into the oven just to melt the butter, then spread the brown sugar evenly over the base of the tin.
  2. Place a drained slice of pineapple in the center of the cake tin, then arrange the other slices in a circle around the central slice. If desired, place cherries and/or walnuts in the gaps between the pineapple.
  3. Make the cake batter by using an electric mixer to beat the eggs until frothy. Add the sugar and continue to beat until thick and fluffy. Sieve in ⅓ of the flour and baking powder then fold in gently. Repeat with the next third of the flour twice more until it is all incorporated. Don’t over mix!
  4. Pour the batter on top of the layer of pineapple, then bake for about 45 minutes or until the cake is fully cooked. Run a sharp knife around the rim, allow to cool for 10-15 minutes then invert onto a cooling rack.


Note: this recipe worked (although it took longer to cook than the original said) and it tasted OK but it was incredibly sweet. This recipe uses 2-4 times as much sugar in the pineapple layer as most modern recipes and honestly this is way too much.

jug of red raspberry tea punch

Raspberry Tea Punch from the Melbourne Herald in 1938


MIX with sugar 1 breakfastcupful of ripe, firm raspberries, and leave for three or four hours for the sugar to dissolve. Crush the fruit and pass through a hair sieve. Add the resultant juice to 2 cups of fairly strong tea, then squeeze in the juice of 1 lemon or half a grapefruit, with 3 tablespoonfuls of strained orange juice. Just before serving add ½ pint of ginger ale. Serve with chopped ice and garnish with a few whole raspberries. As an alternative, a blob of icecream may be substituted in place of the whole fruit and the ice.

Note: This was probably the stand out recipe of the day, and so simple to make. I used ¼ cup of sugar to 1 cup of raspberries and followed the rest of the recipe as written although I added more ginger ale to make it stretch further. I’d recommend doubling the recipe if you have a group.


the author in a park, holding a pineapple cake and smiling

Photo by Lucas Garron


Fruit Damper for the Great Rare Books Bake Off

It’s time for the annual Penn State vs. Monash University Great Rare Books Bake Off where readers and cooks can support a side by making a recipe from the universities’ special collections. This year there are twelve recipes to choose from, from Wet Shoo Fly Pie to Lamington Cake. I figured I’d better go with an Australian recipe, as a matter of national pride and all. When I realised I’d never made damper for the blog, the choice of recipe was an easy one!


Damper is an Australian quickbread, traditionally unleavened and cooked in the ashes of the campfire. The earliest references come from the mid-1820s and damper is most commonly associated with people who are traveling or who are living and working in basic conditions in the bush.

“… we have no doubt that it [the harvest] will give the working family a rasher of good bacon, an excellent damper, and a copious draft of new milk…” [1]


The cook making damper, by Alice Peacock, date unknown. Courtesy of Library and Archives Northern Territory. Used under CC BY 4.0.

As settlements developed, people in towns could buy leavened bread from bakeries or could bake their own if they had an oven. Swagmen (itinerant labourers who carried a bedroll called a swag filled with their belongings), drovers (stockmen who moved cattle or sheep over long distances) and other people on the move didn’t have access to ovens or fresh yeast so they made damper instead. A lot of descriptions of making damper show how people made-do with hardly any equipment by mixing the dough on a sheet of bark, a sheepskin or the upturned lid of some luggage.


“At first we had rather a horror of eating damper, imagining it to be somewhat like an uncooked crumpet. Experience, however, showed it to be really very good. Its construction is simple, and is as follows. Plain flour and water is mixed on a sheet of bark, and then kneaded into a disc some two or three inches thick to about one or two feet in diameter, great care to avoid cracks being taken in the kneading. This is placed in a hole scraped to its size in the hot ashes, covered over, and there left till small cracks caused by the steam appear on the surface of its covering.”[2]

Over time, the making of damper has changed a lot. As late as 1929, it was still possible to argue that real damper couldn’t have baking soda added to it but in reality chemical raising agents like bicarbonate of soda, cream or tartar and baking powder made damper lighter and were certainly being used by the 1850s.[4]

“A stiff dough is made of flour, water, and salt, and kneaded into a large flat cake, two or three inches thick, and from twelve to eighteen broad. The wood-ashes are then partially raked from the hot hearth, and the cake being laid on it, is heaped over with the remaining hot ashes, and thus bakes. When cut into it, it exceeds in closeness and hard heaviness the worst bread or pudding I ever tasted, and the outside looks dirty, if it is not so: still, I have heard many persons, conversant with every comfort and luxury, praise the “damper,” so I can only consider my dislike a matter of taste. In “the bush,” where brewer’s yeast cannot be procured, and people are too idle or ignorant to manufacture a substitute for it (which is easily done), this indurated dough is the only kind of bread used and those who eat it constantly must have an ostrich’s digestion to combat its injurious effects.”[3]

It is also rare now to see damper cooked directly in the ashes, where it inevitably becomes dirty and ashy. At home, people use the oven but when camping damper is often cooked in the coals in greased aluminium foil or in a camp oven. Also called a Dutch oven, camp ovens are cast iron pots with a lid that can be used to cook food on an open fire. The fire is allowed to cook down to coals, the dough is placed in the camp oven (preferably on a trivet or some foil) and the lid placed on top. Coals are raked around the oven and a scoop of coals put on the top so that the heat is even around the oven.

watercolour painting of men between a tent and a fire with a camp oven for making damper

This watercolour sketch shows a camp from 1851 with a tent in the background. In the centre, one man kneels to knead the dough for damper, while a camp oven sits beside the fire ready for use. From ‘A collection of drawings in watercolour, ink and pencil: illustrative of the life, character & scenery of Melbourne 1850-1862. First series’, by William Strutt, courtesy of the State Library of NSW.

Damper also has an important history for First Nations people in Australia. New evidence from Madjedbebe, a rock shelter in northern Australia, shows that Indigenous people in Australia have been grinding seeds for about 60,000 years.[5] Grinding stones, microbotanical residues like starches, ethnographic accounts and oral histories all point to the important role that seeds and plant-processing played in First Nations foodways.[6] This is especially true in the arid desert areas of central Australia where seeds became a staple food, probably during the late Holocene.[7]


After collection, winnowing and grinding seeds with water, the seed-paste can be eaten raw or the paste could be cooked in the ashes of the fire to make seed cakes also called bush bread or, sometimes, damper. The technique of cooking seed cakes directly in the fire may have been something that European settlers learned from Indigenous people.


The arrival of settlers, who cut First Nations people off from some of their traditional food resources, and the development of the ration and mission systems which depended heavily on wheat flour meant that by the 1970s most communities no longer regularly collected and ground seeds for food.[8] Instead, damper made from wheat flour and raised with baking powder became common in Aboriginal communities.


You can see the two different damper baking techniques that I described above in two videos. The first shows Gurindji woman Violet Wadrill Nanaku making damper in the ashes of the fire where they puff up kind of like naan bread. The second shows Auntie Junie Pederson and Roy Wilson baking damper in a camp oven on a station in the Kimberley.

Image shows an open book with recipe for fruit damper on the left page and a two-color relief print in blue and red on the right page.

This recipe, taken from the Kimberley Cook Book: “some old recipes and some new ones” in the Monash University Special Collections, is from the same region in north-west Australia. I couldn’t find out much about the book, but the recipes were collected during the 1990s in remote communities. The book was edited by Marianne Yambo and is illustrated with linocuts by artist Jan Palethorpe.


The recipe itself is a pretty basic damper recipe, with no added butter or milk to enrich the dough, but in this case it is flavoured with some spices and plenty of dried fruit. I cooked it in a camp oven inside my oven, a technique often used for homemade sourdough to give more even heat distribution and to get a nice crust, but also a nod to the campfire origins of the recipe. It makes a very dense but flavourful bread that is best eaten slathered with butter while still warm, or toasted the next day if you have any left.

Fruit Damper


2 cups flour

4 tsp baking powder

Salt

1/2 cup chopped dried fruit (e.g. cranberries, raisins, currants, apples, apricots)*

1/4 tsp cinnamon (add some other spices if you want, cloves are nice or some nutmeg)

Approx 1 cup water


  1. Preheat oven and camp oven to 200°C.
  2. Put all dry ingredients in a large bowl and stir to combine. Gradually add enough water to bring together into a supple dough. Turn out onto counter and knead for a couple of minutes until smooth.
  3. Make the dough into a smooth ball and flatten slightly. Slash the top of the bread, if desired.
  4. Carefully take the hot camp oven out of the oven, sprinkle a little flour on the bottom and quickly put the bread in the camp oven. Put the lid on and bake for approx. 40 mins or until the crust is slightly golden and the damper sounds hollow when you knock on it.


*use whatever dried fruit you have on hand, but I would say that some apricots are essential


[1] “Hobart Town.,” Hobart Town Gazette and Van Diemen’s Land Advertiser, January 28, 1825.

[2] C. H. Eden 1872 in Edward E. Morris, Austral English: A Dictionary of Australasian Words, Phrases and Usages (London: Macmillan, 1898).

[3] Louisa Meredith, Notes and Sketches of New South Wales During a Residence in the Colony from 1839 to 1844, ed. Ure Smith (1844; repr., Sydney, NSW: National Trust of Australia, NSW, 1973), 67.

[4] “Making Damper,” Western Mail, February 21, 1929; Barbara Santich, Bold Palates: Australia’s Gastronomic Heritage (South Australia: Wakefield Press, 2012), 220.

[5] Chris Clarkson et al., “Human Occupation of Northern Australia by 65,000 Years Ago,” Nature 547, no. 7663 (July 2017): 306–10, https://doi.org/10.1038/nature22968; S. Anna Florin et al., “The First Australian Plant Foods at Madjedbebe, 65,000–53,000 Years Ago,” Nature Communications 11, no. 1 (February 17, 2020): 924, https://doi.org/10.1038/s41467-020-14723-0.

[6] Wendy Beck, “Aboriginal Preparation of Cycas Seeds in Australia,” Economic Botany 46, no. 2 (1992): 133–47; Richard Fullagar and Judith Field, “Pleistocene Seed-Grinding Implements from the Australian Arid Zone,” Antiquity, 1997; John Mildwaters, “Seed-Grinding Stones: A Review from a Mainly Australian Perspective,” The Artefact: The Journal of the Archaeological and Anthropological Society of Victoria 39 (2016): 30–41, https://doi.org/10.3316/ielapa.242662889512125; John Mildwaters and Chris Clarkson, “The Efficiency of Australian Grindstones for Processing Seed: A Quantitative Experiment Using Reproduction Implements and Controlling for Morphometric Variation and Grinding Techniques,” Journal of Archaeological Science: Reports 17 (February 1, 2018): 7–18, https://doi.org/10.1016/j.jasrep.2017.10.036; John Mildwaters and Chris Clarkson, “An Experimental Assessment of the Grinding Characteristics of Some Native Seeds Used by Aboriginal Australians,” Journal of Archaeological Science: Reports 30 (April 1, 2020): 102127, https://doi.org/10.1016/j.jasrep.2019.102127; Josephine Nangala et al., “Ethnobotany of Warrilyu (Eucalyptus Pachyphylla F.Muell. [Myrtaceae]): Aboriginal Seed Food of the Gibson Desert, Western Australia,” Economic Botany 73, no. 3 (September 1, 2019): 416–22, https://doi.org/10.1007/s12231-019-09471-2.

[7] Scott Cane, “Australian Aboriginal Subsistence in the Western Desert,” Human Ecology 15, no. 4 (1987): 391–434; Mike Smith, The Archaeology of Australia’s Deserts (New York: Cambridge University Press, 2013), 197 especially; David W. Zeanah et al., “Diesel and Damper: Changes in Seed Use and Mobility Patterns Following Contact amongst the Martu of Western Australia,” Journal of Anthropological Archaeology 39 (September 1, 2015): 51–62, https://doi.org/10.1016/j.jaa.2015.02.002.

[8] Zeanah et al., “Diesel and Damper.”


Virtual Gatsby Summer Afternoon Picnic

Every September the Art Deco Society of California hosts the Gatsby Summer Afternoon but even though I’ve been living in the Bay Area for the last few years I’ve never made it to one of these huge art deco themed picnics. This year, because of COVID-19, there was a Virtual Gatsby Summer Afternoon which meant that we could run a scaled-down version of our own. We had a great time with some of the neighbours, and won best small picnic!

Being back in Australia, I went with an Australian 1930s theme and nearly all the recipes were recommended for picnics in Australian newspapers during the 30s. Some were surprise hits (cream cheese and walnut sandwiches anyone?) but others like the beetroot mould, not so much.


These vintage recipes are a super easy way to get started with historical cooking, and are easy to add into everyday life, but make a really impressive collection when you make a few together. You could also try this recipe for chicken picnic patties that I’ve made before, and read a little about the tradition of picnics in Australia too. If you feel inspired to make some, leave a comment to let me know how it goes! And to get you in the spirit, try listening to this Balboa playlist by John Bell while cooking and/or picnic-ing!

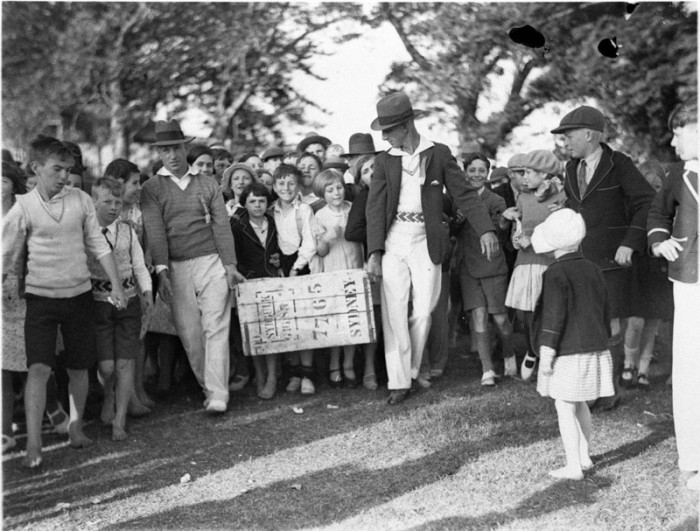
Try some of these recipes and you can have a delightful picnic, just like this stylish 1930s family. Picnic Delights! 1935, The Australian Women’s Weekly (1933 – 1982), 2 November, p. 35. ,[Public Domain] via Trove.

The Recipes

Cheese Paste Sandwiches from the Launceston Examiner, 11 Dec 1935


“Cheese Paste. – ¼ lb. Butter, ½ lb. cheese grated, 3 eggs, 2 tablespoons milk, cayenne pepper. Method: Put butter and milk in saucepan and melt, add cheese, do not stir until cheese is melted. Add eggs well beaten and cayenne. Stir until it thickens, but do not let the mixture boil. Put into jars and cover with oil paper and keep in cool place. Serve hot or cold, spread on biscuits, in sandwiches, or on pastry.”


Notes: Like most of the recipes here, I scaled this down since I was making a lot of different recipes. I used 57g butter, 113.5g grated cheddar cheese, 1.5 eggs, 1 tbsp milk, and a pinch of cayenne. Make this the day before you want to eat the sandwiches, and put it in a little jar or ramekin and allow it to set in the fridge. To make the actual sandwiches, spread the paste on lightly buttered bread and if you want you can cut the crusts off. We had plenty of leftovers, and ate it on toast.

sandwiches, cheese biscuits and chicken turnovers made from 1930s recipes

Cucumber Sandwiches from the Yackandandah Times, 3 Oct 1930


“Cucumber Sandwich. – Spread some bread and butter with very thin slices of cucumber and a little thick cream mixed with salad dressing.”


Notes: for the salad dressing recipe see below. These were simple but delicious!


Walnut and Cheese Sandwiches from the Yackandandah Times, 3 Oct 1930


“Walnut and Cheese Sandwich. – Cut some slices of thinly-buttered bread, and spread them with a good layer of cream cheese, followed by a thick layer of nuts chopped into small pieces, add a little salt and press the bread together.”


Notes: I didn’t expect much of these, but was really pleasantly surprised and they were the first thing to disappear.


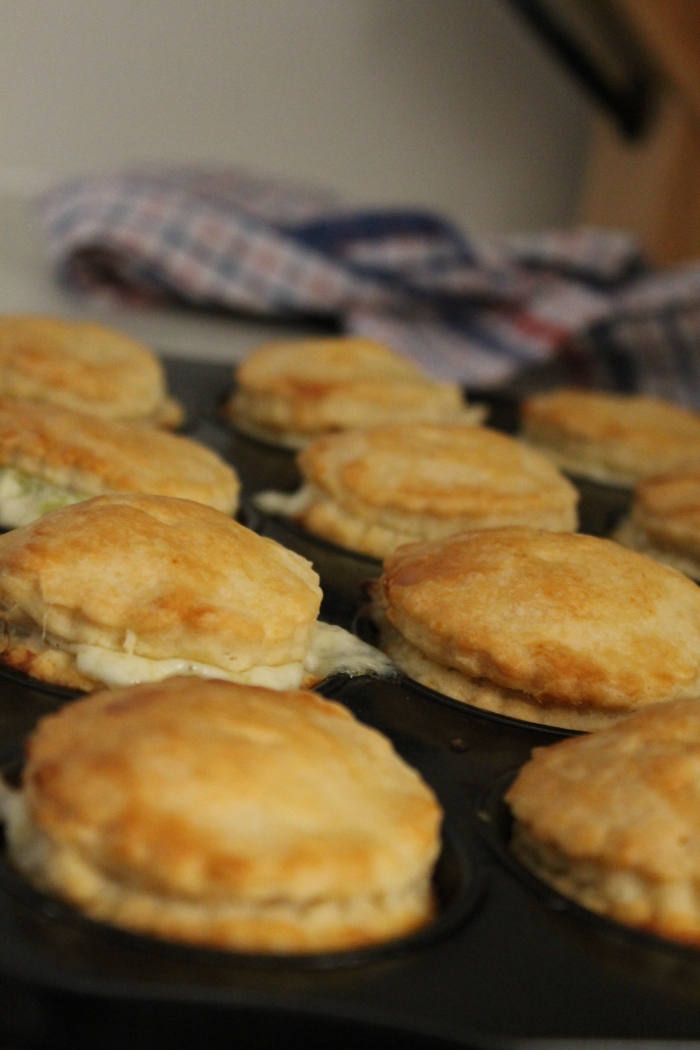
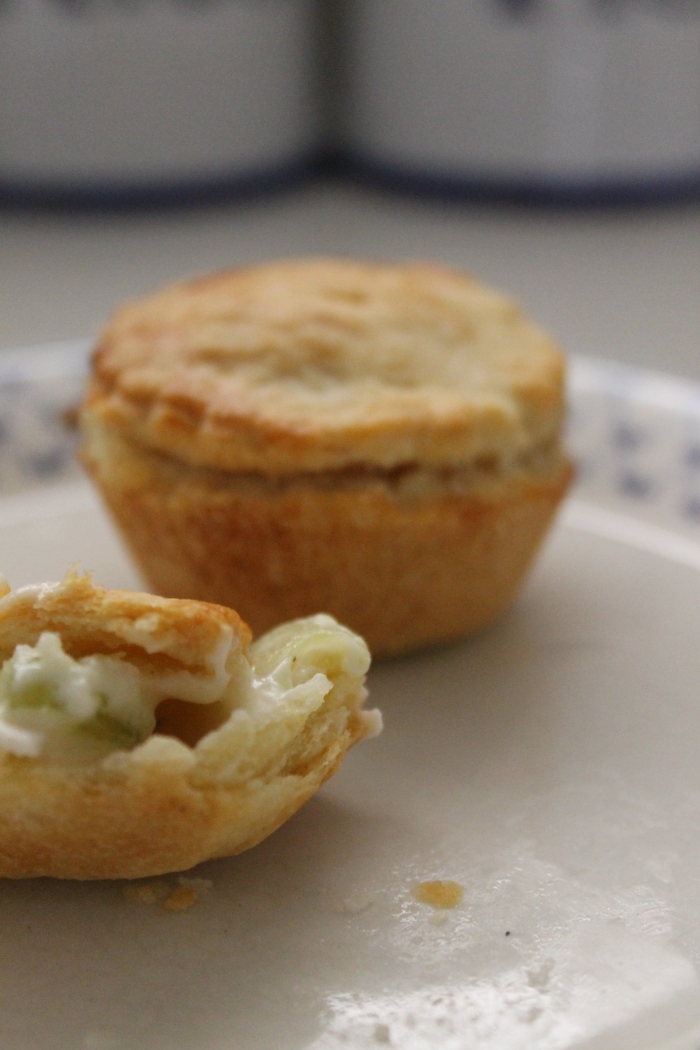
Cheese Biscuits from the Melbourne Age, 27 Nov 1937


“Take ½ oz. butter, 1 oz. flour, ½ oz. grated cheese, salt, pepper and a dash of cayenne pepper. Rub the butter lightly into the flour, then add the grated cheese and seasonings. Make this into a stiff paste with cold water, then roll out on a floured board. Cut into rounds with a two-inch pastry cutter. Brush the biscuits over with beaten egg, and bake in a moderate oven.”


Notes: I doubled this recipe and actually could easily have made more, these were my favourites on the day. They’re basically really cheesy little crackers. I used 28g butter, 28g grated cheddar, 56g flour, a little salt, pepper and cayenne, and enough cold water to bring the dough together. Bake them until golden at around 180°C.

mayonnaise of eggs, recipe from 1935

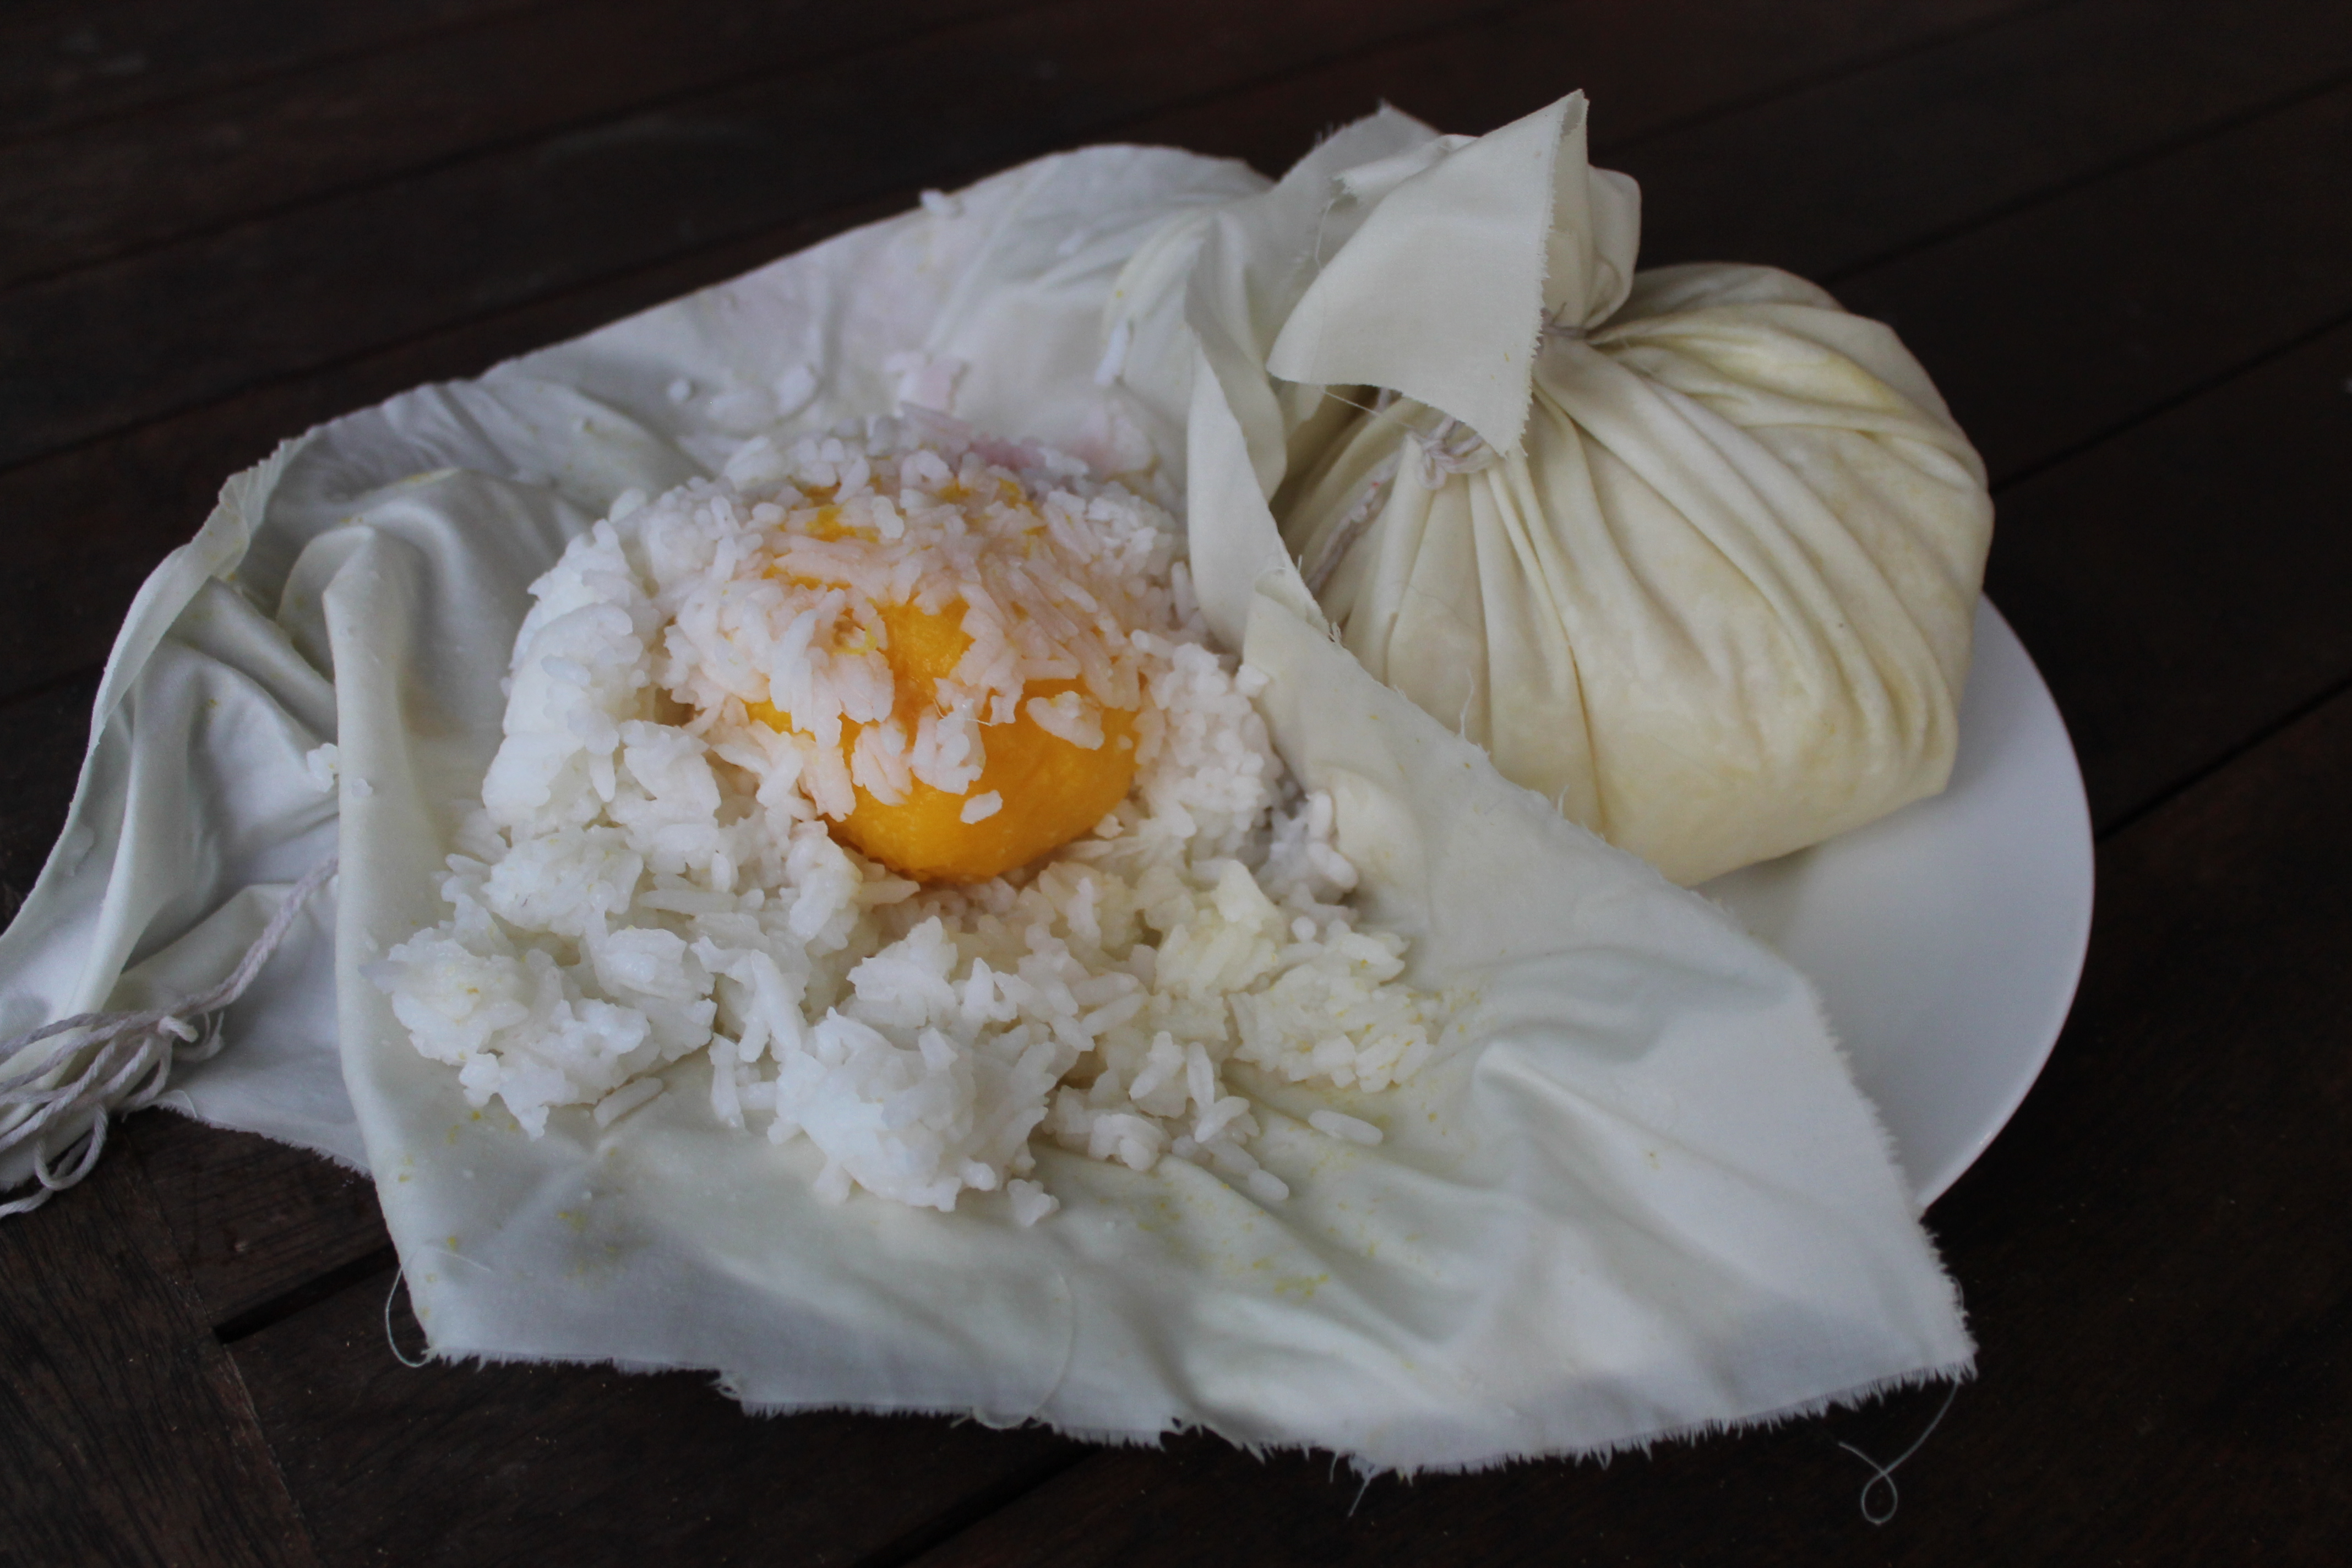
Mayonnaise of Eggs from The Australian Women’s Weekly, 2 Nov 1935


Hard-boiled eggs, lettuce, mayonnaise or salad dressing.

Shell eggs; cut in half; shred the lettuce finely and place a little in paper souffle-cases. Arrange an egg on the bed of lettuce. Pack in box. Carry mayonnaise in cardboard screw-top container. When you arrive at destination a little mayonnaise can be poured over the egg.”


Notes: It wouldn’t be a vintage picnic without a slightly disturbing mayonnaise recipe. This one couldn’t be simpler, and looks great in little paper muffin cases if you don’t have souffle cups on hand.

Beetroot mould, recipe from 1935

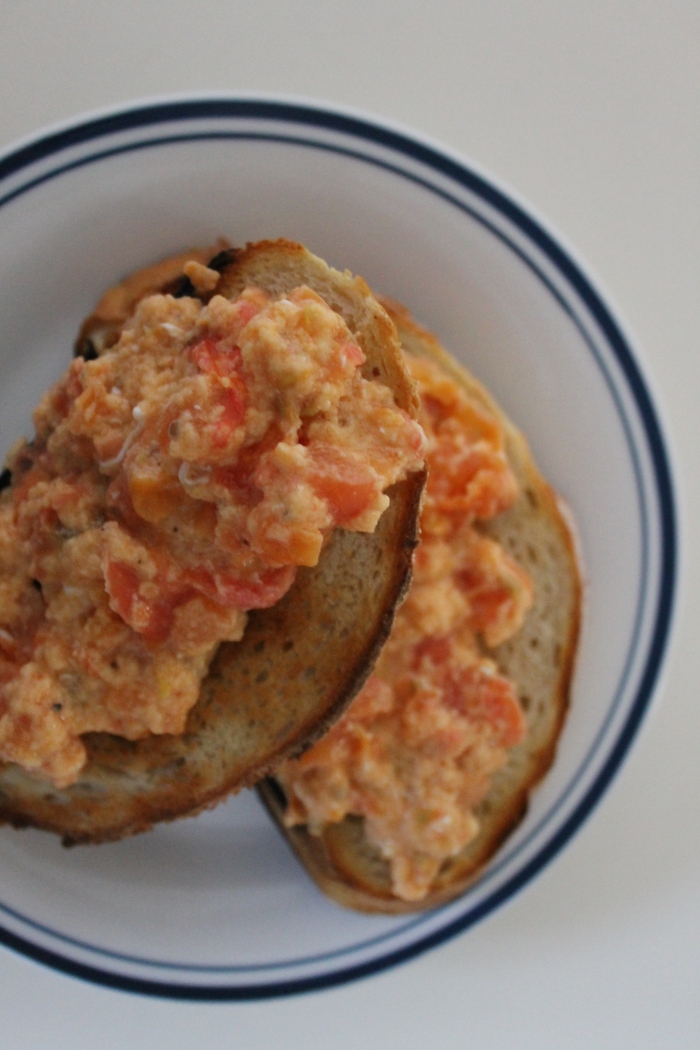
Beetroot Mould from The Australian Women’s Weekly, 2 Nov 1935


“One bunch beetroot, water, a little vinegar, 6 cloves, powdered gelatine, salt and mustard, cayenne.

Prepare beetroot by washing it well and leaving the stalks on. Do not cut it in any way or prick it, otherwise it bleeds. Put the beetroot into a large saucepan of boiling, salted water and boil till tender. Drain in a colander. When cold, remove the skin and cut into thin slices. Take one piece of beetroot before cooking, peel it, and boil it in vinegar and water to which salt, cayenne, mustard and cloves have been added. The object of peeling is to extract the color, making the liquid red. Strain it, and to every cupful of liquid add one dessertspoon of gelatine. Stir till well dissolved. Line a wetted mould with the cooked beetroot. Pour in liquid and leave on ice till set. Turn out in the usual way and serve with cold meat.”

Notes: this was so bad it was basically inedible but if you want to give it a go yourself boil 3 whole beets in salted water until tender, drain and cool before peeling and slicing thinly. Boil a fourth, peeled, beet in 1 ½ cups water, 1 cup vinegar, 6 cloves, 1 tsp mustard powder, ½ tsp cayenne pepper and a little salt. Measure the liquid, and sprinkle on one dessertspoonful of gelatine for every 250ml of liquid, stir to dissolve. Line a wetted ring mould with the sliced beetroot and gently pour the liquid on top. Leave in the fridge to set overnight, then dip the mould briefly in a sinkful of hot water to loosen before turning out onto a plate (just a second or two should do it, don’t leave it too long or you will dissolve the jelly!).

I did use mustard powder instead of mustard, but think that it probably should have been English style mustard or something similar. The cayenne and vinegar flavours are very strong so you could certainly reduce the amount of cayenne. Possibly it would be slightly better if served with a fatty cold meat, but I doubt it would ever be good.

Potato salad, recipe from 1937

Potato Salad from the Melbourne Age, 27 Nov 1937


“Take 2 cupfuls of cooked potatoes, 1 tablespoonful chopped parsley, 1 teaspoonful chopped onion, ½ teaspoonful salt, a dust of pepper and French dressing. Cook the potatoes in salted water till they are tender, but not squashy. When cool, cut them up, add the parsley, and moisten with the dressing. Season with salt and pepper and toss together lightly. Sprinkle with the onion, and stand in a cool place till they are very cold. This can quite easily be packed in a billy for a picnic.”


Notes: this was delightful, with a light dressing unlike creamy potato salads which are so common now. I made the dressing by combining ½ cup olive oil, 16 cup red wine vinegar, ½ tsp icing sugar and some salt and pepper in a small jar. Use new potatoes if you can get them.

cucumber boats, recipe from 1937

Cucumber Boats from the Hobart Voice, 20 Feb 1937


“Take three cucumbers, 2 or 3 tomatoes, ½ cup chopped celery, 1 teaspoon chopped shallots, lettuce, salad dressing. Chill cucumbers and tomatoes. Peel the cucumbers and cut them into halves, lengthwise, without breaking them. Scald and skin the tomatoes and cut into dice or cubes, drain off the juice. Mix the cucumber pulp, the tomatoes, and the chopped celery, and add a little salt and pepper to flavor. Fill the cucumber halves with this, and pile high. Arrange them on a bed of crisp lettuce leaves. Garnish with curls of celery or some water cress, and serve with a salad dressing.”


Notes: these would be quite a fun thing for kids to help make, and for older kids you can set them to making the celery curls to garnish the plate. I used two small Lebanese cucumbers, and you scoop out the seeds in the center before piling them high with filling.

epicurean fruit salad, recipe from 1935

Epicurean Fruit Salad from the Launceston Examiner, 11 Dec 1935


“Peel, prepare and dice apple, pear, orange, ½ grapefruit, pineapple, ½ stalk white celery, walnuts cut into dice. Mix all these fruits together lightly. Arrange on lettuce leaves, garnish with a cherry. Serve with a cream salad dressing to which has been added 1 tablespoon whipped cream. – Mrs. H. A. Beasley, Upper Melbourne-street, Launceston.”


Notes: this is a kind of sweet/savoury fruit salad and I wasn’t sure how it would go, especially with salad dressing but it was actually very pleasant.


Cream Salad Dressing from the Williamstown Chronicle, 8 Feb 1936


“One tablespoon flour, 1 ½ tablespoons butter, 1 egg, ¾ cup milk, salt, cayenne, 1 teaspoon mustard, 1 ½ tablespoons sugar, ¾ cup vinegar. Mix all dry ingredients. Add beaten egg, milk, and butter. Cook over boiling water till mixture thickens, then add vinegar gradually, stirring constantly. Strain and cool.”


Notes: this was also surprisingly good, with a nice tanginess to it. Cook it in a bain marie, and keep a careful eye on it because the bottom will thicken faster than the rest so you need to keep whisking it to avoid lumps.

almond biscuits, recipe from 1933

Almond Biscuits from the Western Argus, 19 Sep 1933


“You will like these biscuits to take with you on your picnics. Cream together ¼ lb. of butter and ¼ lb. of caster sugar. Stir in two well-whisked eggs and gradually add 6 oz. of self-raising flour, a pinch of salt, and ¼ lb. of ground almonds.

Mix well together until a stiff paste is formed. If too moist add a little more flour. Roll out about ¼ in. thick on a well-floured board, cut into small rounds of fancy shapes, put on flat greased tins, brush over with a little beaten egg and milk, and sprinkle with chopped blanched almonds.

Bake in a moderate oven for about 15 minutes or until golden brown. Leave the biscuits on the tins for a little while after taking out of the oven, or they are liable to break when removed.”


Notes: I used 113g butter, 113g caster sugar, 2 eggs, 170g self-raising flour, a pinch of salt, 113g ground almonds and some chopped, blanched almonds. These were pretty plain, but good.

Wasgington Sponge Cake, recipe from 1937

Washington Sponge Cake from The Tribune, 5 Nov 1937


“This Washington sponge cake is made with ingredients as follows: 1 ¼ cups sifted cake flour; 1 ¼ teaspoons double-acting baking powder; ¼ teaspoon salt; 1 cup sugar; 1 tablespoon grated orange rind; 2 eggs and 1 egg yolk; ¼ cup orange juice; ¼ cup water; raspberry jam. Sift flour once, measure, add baking powder and salt, and sift together three times. Add ½ cup sugar and orange rind to eggs, and beat with rotary egg beater until thick and lemon-colored; add remaining sugar gradually, beating very thoroughly; then add orange juice and water. Add flour gradually, beating with rotary egg beater until smooth. Bake in two ungreased 9 inch layer pans in moderate oven (350 degrees F.) 30 minutes or until done. Invert on rack until cakes are cold. Spread jam between layers. Sift powdered sugar over top.”


Notes: I thought this recipe was from an Australian newspaper, but it turns out it’s actually from a newspaper based in the Philippines. The main change I made was to grease and line the base of the two pans because I didn’t want to risk them sticking. The cake was good, but very sweet. It might help to add a layer of whipped cream on top of the jam between the layers, in order to cut some of the sweetness. Sift over icing sugar to serve.


pineapple julep, recipe from 1939

Pineapple Julep from Good Drinks by Ambrose Heath, first published 1939


“Peel, slice, and cut up a ripe Pineapple into a glass bowl, add the juice of two Oranges, a gill of Raspberry syrup, a gill of Maraschino, a gill of old Gin, a bottle of sparkling Moselle and about a pound of shaven ice. Mix and serve.”


Notes: warning, this is pretty potent stuff! I made a basic simple syrup with some raspberries, then sieved it to remove the seeds. A gill is about 120ml, so I used half a cup of syrup, half a cup of cherry liqueur, half a cup of gin, ½ a pineapple, 2 oranges, and a bottle of prosecco. Mix and add plenty of ice. I also threw in some borage flowers since I had them and they’re so pretty in drinks.


Two Vintage Passionfruit Recipes for Using Up a Glut

Passionfruit flummery, recipe from 1939

I spent August at home in Brisbane and our passionfruit vine was loaded down with fruit. There were so many little bulbs of deliciousness that I racked my brain trying to figure out what to do with them all. That means, of course, searching Trove for historical recipes to test.

I’m not sure it’s generally very well known that Australia has a proud baking tradition (although people overseas do comment on the Australian sweet tooth) but many of Australia’s most iconic treats are baked: lamingtons, ANZAC biscuits, gems cones, pumpkin scones, damper, even pavlova.

While many of the baked goods were variations on European traditions, such as gingerbread, sponge cakes or scones, Barbara Santich argues that what makes Australian baking unique was the proliferation of variations.[1] She suggests that sweet recipes took up a much larger proportion of 19th and early 20th century Australian cookbooks compared to contemporary English cookbooks, perhaps two or three times as many.[2]

The warm growing conditions facilitated this experimentation; sugar was cheaply available, especially as the Australian sugar business took off, and fruit was abundant. Two tropical flavours, in particular, came to the forefront: coconut and passionfruit. While passionfruit is now most commonly used as a topping for pavlova, it was also used as a filling or icing for cakes, and made into jams, jellies and butters, puddings, slices, pies, biscuits, creams and flummeries.

Passionfruit flummery, recipe from 1939

The Recipes

The first recipe I decided to make was a 1939 recipe for Passionfruit Custard Slices. The slice, a rectangular slab of baked goodness that’s cut into slices, is a highlight of Australian baking.  No country bakery is complete without vanilla slice – a thick layer of vanilla custard sandwiched between crisp, golden pastry. Passionfruit slice is a variation on this, with a passionfruit icing on top of the upper layer of pastry.

What makes this recipe different is that it doesn’t use a real custard for the filling. Instead, you make a white sauce which is then enriched with sugar and egg yolks. I was pretty wary of this, since it didn’t sound like it would be thick enough, or particularly tasty. However, because it’s not very sweet it does a really good job of balancing out the extremely sugary icing.

Passionfruit Custard Slices

INGREDIENTS: 1/2lb. Puff, rough puff or flaky pastry.

FOR CUSTARD: 1 tablespoon butter, 1 heaped tablespoon flour, 2 egg yolks, 1 cup milk, 1 or 2 passionfruit.

FOR ICING: 1/2lb. Icing sugar, 2 passionfruit.

Method: Roll prepared pastry square or oblong in shape, place on baking tray, brush surface with egg white, then cook in hot oven for 15 to 20 minutes, decreasing heat when well risen and lightly brown. Lift on wire cooler, and, when cold, split in two layers. Melt butter in saucepan, add flour and blend smoothly, cook for a minute, then add milk, and stir until mixture boils and thickens. Stir in sugar, egg yolks, and cook without reboiling the custard. Stir until cool, add passionfruit pulp or strained juice, then spread one layer of pastry with custard and cover with other layer. Mix sifted icing sugar with passionfruit pulp or strained juice, forming a smooth icing. Pour over pastry surface and when firmly set, cut into slices.[3]

Passionfruit flummery, recipe from 1939

Another staple of passionfruit desserts is the moulded jelly or pudding. A flummery is basically a jelly made with a substance such as cream or milk to make it opaque. They have a long history, dating back to at least the 17th century when it was made with oats or wheat, but have mostly disappeared now. Flummery still survives in some Australian households as ‘jelly whip’, a cheap, mousse-like dessert in which evaporated milk is whipped into nearly set jelly. This version from 1933 is even cheaper, and is dairy free, because it uses flour rather than a dairy product to make the jelly opaque.

Passionfruit Flummery

Soak 1 tablespoon gelatine in 1 cup cold water for 2 hours, then add 1 1/2 cups sugar. Mix 1 tablespoon plain flour with 1 cup cold water, the juice of 2 oranges and 1 lemon. Put all on fire together and bring to the boil, remove, and when nearly cold add the pulp of 6 passionfruit, and beat till thick and white.[4]

My flummery separated, I think maybe because the jelly wasn’t cold enough when I whipped it. It was still OK, with a layer of plain jelly on the bottom and then a layer of flummery with the texture more like marshmallow fluff or something like that. The main problem was just that the jelly was wayyyyy too sweet.

[1] Barbara Santich, Bold Palates (Kent Town: Wakefield Press, 2012), 193.

[2] Santich, 190.

[3] “PASSIONFRUIT,” The Sun, January 8, 1939.

[4] “Delicious Passionfruit Recipes,” The Northern Star, August 3, 1933.

Passionfruit custard slice, recipe from 1933

The Redactions

Passionfruit Custard Slice

225g puff, rough puff or flaky pastry

2 eggs, separated

1 tablespoon butter

1 heaped tablespoon flour

1 cup milk

2 passionfruit

For the icing:

225g icing sugar

2 passionfruit


  1. Heat the oven to 190°C. Roll the pastry into a square or oblong, place on baking tray and brush the surface with the beaten egg white.
  2. Bake for 15 to 20 minutes, decreasing heat when well risen and lightly brown. Place on a wire rack to cool and, when cold, cut in half to make two layers.
  3. Melt the butter in a saucepan, add the flour and whisk to blend. Cook for a minute, then add the milk bit by bit, and stir until the mixture boils and thickens.
  4. Stir in the sugar and egg yolks, and cook without boiling the custard. Stir until it is cool then add the pulp of two passionfruit.
  5. Spread the custard on one layer of pastry, and add place the second layer of pastry on top.
  6. To make the icing, mix the sifted icing sugar with the pulp from the remaining two passionfruit to make a smooth icing. Pour over the pastry surface. Refrigerate until it sets then cut into slices.


Passionfruit Flummery

1 tbsp gelatine

2 cups cold water

1 ½ cups sugar

1 tbsp plain flour

2 oranges, juiced

1 lemon, juiced

6 passionfruit


  1. Dissolve the gelatine in 1 cup of the water, then add the sugar.
  2. Mix the flour with the remaining cup of cold water and the orange and lemon juice.
  3. Mix the gelatine and the juice mixture together in a saucepan, and bring to the boil. Remove the mixture and allow to cool.  When nearly cold add the passionfruit pulp and beat it until it is thick and white.


Passionfruit flummery, recipe from 1939

References

“Delicious Passionfruit Recipes.” The Northern Star. August 3, 1933.

“PASSIONFRUIT.” The Sun. January 8, 1939.

Santich, Barbara. Bold Palates. Kent Town: Wakefield Press, 2012.


Wartime Strawberry Jam

Strawberry Jam, recipe from 1915

In a total coincidence, it is both jam month in the Food in Jars Mastery Challenge, and the Recipes Project Virtual Conversation month. If you haven’t been following along with the conversation, check it out because there are loads of really interesting things going on covering all types of recipes in all periods.


One of the projects that I’ve been really interested in is the series of videos by Simon Walker called “Feeding Under Fire”. In each video, Simon recreates a dish that soldiers would have eaten during World War 1, and contextualises it with information about nutrition, supply lines and what was happening on the home front.


The second video in the series (see it here) was all about the important role that jam played in soldiers’ diets. The recipe that he used was for plum and apple jam, which seems to have been the most common type of jam sent to the front lines. Even though Simon wasn’t very happy with how his jam turned out, it inspired me to make a WW1 era jam too.

Capture

A recipe for the ubiquitous plum and apple jam, from the Southland Red Cross Cookery Book, 1916.  

In Australia during the First World War, there wasn’t rationing like there was in Britain. Food prices rose rapidly, and the State and Federal governments had only mixed success in setting prices for staple food. With complete control over the sugar industry, it was easier to restrain the market. When sugar prices rose overseas, the Australian government banned exports, in order to maintain sufficient supply at home.[1]


Because sugar was available in greater quantities, and generally for a lower price than in Europe, it was easier for Australian home cooks to keep making jam. Large quantities of jam were made to be sent to Australian soldiers overseas, often in packs of treats sent by the Red Cross or the Australian Comforts Fund.

bcp_05694h

“Special Effort – 2 tons of jam made by the Cobar Ladies Jam Club”. World War I – Cobar, NSW. Courtesy of the State Library of NSW.

Commercially made jam was available too, and it featured prominently in the meals provided to Australian soldiers. A large surplus of tinned jam was also sold to the British and American armies. In total, the export of jam during the war was 40 times as large as in the pre-war years.[2] As in England, much of this jam seems to have been plum and apple, but sometimes more unusual varieties appeared too.[3] According to Barbara Santich, the Imperial forces bought nearly 2,000 tons of Queensland pineapple jam![4]


Strawberry jam doesn’t seem to have been very common, presumably because strawberries are expensive to buy and comparatively low yielding. Some newspapers published recipes for mock strawberry jam, made with rhubarb and raisins (I also like this recipe from the Second World War which uses tomatoes and strawberry flavouring).


Still, strawberry jam was clearly available. In 1940, Colonel J. Travers suggested that it should be given to all soldiers, because he recalled that “During the last war, we were usually issued with strawberry jam only before a fight … but there seems no reason why these men should not have strawberry jam at other times.”[5] It’s not hard to imagine the excitement that a jar of strawberry jam would have caused, nestled in a comfort box with warm socks and a bit of cake. It was a taste of home, and a welcome distraction from the monotony of bully beef and hard tack.

Strawberry Jam, recipe from 1915

The Recipe

This recipe was published in The Farmer and Settler, a NSW newspaper in January 1915.

Strawberry Jam No. 2 Recipe

Personally I prefer this method of making, as it does not mash the fruit: – Strawberries that are to be used for the purpose of this jam must be gathered after two or three days of dry weather. The berries should not be over-ripe.

The usual method is to lay the fruit and the sugar in alternate layers in the preserving pan, and to boil the jam very gently over a medium heat until it jellies when tested in the usual way. Three-quarters of a pound of sugar per pound of strawberries is generally sufficient, but if the berries do not appear to be particularly sweet, five pounds of sugar to each six pounds of strawberries will be a better proportion.[6]


If you want a jam with large pieces of fruit in it, this method of layering the fruit and sugar works really well. However, the proportion of sugar to fruit is quite high, so the final result is very sweet. It is also a very soft set jam, almost a syrup, because strawberries are low in pectin and there is no pectin added to the recipe.

[1] Scott, Australia during the War, XI:646–48.

[2] Ibid., XI:544.

[3] “War With Jam On It: As It Seems to Veterans.”

[4] Santich, Bold Palates: Australia’s Gastronomic Heritage, 254.

[5] “Strawberry Jam for the Soldiers.”

[6] “Strawberry Jam No. 2 Recipe.”

Strawberry Jam, recipe from 1915

The Redaction

Strawberry Jam No. 2

Strawberries

Sugar


  1. Hull your strawberries, and weigh them. Measure out 3/4 of that weight in sugar (so if you have 400g strawberries you need 300g sugar).
  2. Take a preserving pan large enough to fit all your strawberries and sugar. Place half the strawberries in the bottom of the pan and spread them out to make an even layer. Put half the sugar on top, followed by the remaining strawberries and the rest of the sugar. For large quantities you may want to increase the number of layers.
  3. Slowly heat the mixture, without stirring, until all the sugar is dissolved. Then cook the jam over medium heat until it set using the wrinkle test (it will be about 105C). Pour the hot jam into sterilised jars and seal.


The Round-Up

The Recipe: Strawberry Jam No. 2 Recipe (available here)

The Date: 1915

How did you make it? See above.

Time to complete?: 45 mins.

How successful was it?: It’s very sweet, with a strong strawberry flavour. I really like the large pieces of strawberry, but I found the set too syrupy for my taste.

How accurate?: The main difference would probably be in the bottling process, although I suppose that there could also be differences in the type of strawberries and sugar. Overall, though, it’s a pretty good approximation.

Strawberry Jam, recipe from 1915

References

Santich, Barbara. Bold Palates: Australia’s Gastronomic Heritage. South Australia: Wakefield

Press, 2012.

Scott, Ernest. Australia during the War. Vol. XI. The Official History of Australia in the War of

1914-1918. Sydney, Australia: Angus and Robertson Ltd., 1936.

“Strawberry Jam for the Soldiers.” Sydney Morning Herald. January 12, 1940.

“Strawberry Jam No. 2 Recipe.” Farmer and Settler. January 5, 1915.

“War With Jam On It: As It Seems to Veterans.” Worker. January 23, 1940.


Strawberry Jam, recipe from 1915

A Happy Idea for a Picnic Dish


Two men carrying a box or picnic hamper to the delight of children, Sam Hood, State Library NSW

Two men carrying a box or picnic hamper to the delight of children, Sam Hood c. 1934, courtesy of the State Library of NSW.


“How we all love a picnic! Wrapped up in that one delightful word is the call of the bush, the call of the surf, fresh air and sunshine, happiness and lots of nice things to eat!”[1] Australia doesn’t have a monopoly on picnics by any means, but the great weather and natural beauty makes picnicking a popular pastime, and that’s nothing new.


Barbara Santich dedicates a whole chapter to picnics in her history of Australian food Bold Palates, and she makes the point that while early picnics were utilitarian (quick meals to break up journeys or roadside stops where there was no inn to be found), they were also a way to celebrate special occasions and even official functions. One of their great attractions was surely that they cut across social and class lines, helped along by guild picnics and cheap public transport. Santich also notes the popularity of ‘mystery hikes’ in the 1930s where bushwalkers took a train to an undisclosed location for a hike and a picnic; one of these in 1932 catered to 8000 people![2]


The recipe that I chose for this HFF challenge is from December 1933 and it’s nice to think that these picnic patties might have been taken along on a mystery hike or two. We’ve talked before about the advantages of pies, they’re easily stored, portable and great for eating on the go. These mini pies have exactly the same benefits, and can be eaten hot or cold.

Capture

The recipe was submitted as part of a competition to find recipes for picnic foods. Although the contributor, Mrs E.E. Wain of Campsie, only got a consolation prize of 2/6 the patties are probably easier to eat than the jellied rabbit which took out first prize!

[1] “Happy Ideas for Picnic Dishes.”

[2] Santich, Bold Palates: Australia’s Gastronomic Heritage, 88.

IMG_4358

The Redaction

Picnic Patties


For the Pastry:

230g flour

3 tsp baking powder

Pinch of salt

1/2 tsp lemon juice

120g cold butter, diced

Cold water, as needed


For the filling:


1 tbsp butter

1 tbsp flour

1/2 cup stock (I used the water that I cooked the chicken in)

1/2 cup cream

Salt (and pepper)

1 cup chopped, cooked chicken (about 1 large chicken breast)

1/2 stick of celery, finely sliced


A little milk or egg wash.


  1. Place the flour, baking powder and salt in a medium mixing bowl. Add the lemon juice and the butter. Rub in the butter with your fingertips until it is the consistency of breadcrumbs. Add cold water a tablespoon at a time and mix gently until the pastry comes together. Be careful not to knead the pastry. Wrap the pastry in clingfilm and refrigerate until needed.
  2. To make the filling, melt the butter in a saucepan over medium heat. Stir in the flour. Cook for a minute and stir to remove any lumps. Add half of the stock and stir to combine, then add the other half of the stock. The mixture should be quite thick. Stir in the cream, seasonings, celery and chicken and turn off the heat.
  3. Preheat the oven to 190°C. Grease a cupcake pan. Roll out 2/3 of the pastry on a floured board. Cut circles from the pastry to fit the cupcake pan. Fill with the chicken mixture, then roll out the remaining pastry to cut lids. Place the lids onto the pies and press down around the edges to seal. Brush with a little milk or egg wash and use the tip of a sharp knife to make a small slit in the top of each pie.
  4. Bake the pies in the oven for about 20 minutes, or until golden on top.


IMG_4369The Round-Up

The Recipe: Picnic Patties (available here)

The Date: 30 December 1933

How did you make it? See above.

Time to complete?: An hour.

How successful was it?: These were very nice, if a little bland. I would have liked them with some carrots and/or peas and a bit more aggressive seasoning. I also found the pastry a bit too thick, so that the proportion of pastry to filling wasn’t quite right, but that is easily fixed.

How accurate?: The recipe doesn’t specify how to make the pastry, so I used this recipe from 1934 for Creamed Chicken Turnovers. Overall I think that these were very accurate, the only major change that I made was to use butter in the pastry instead of lard or dripping, either of which would also make a very good pastry.


References

“Happy Ideas for Picnic Dishes.” The Australian Women’s Weekly, December 30, 1933. Trove.

Santich, Barbara. Bold Palates: Australia’s Gastronomic Heritage. South Australia: Wakefield Press, 2012.

IMG_4360

Mock Crab aka Cheesy Scrambled Eggs

IMG_4103This is just a quick post to get me back on track with the
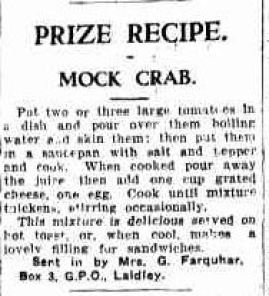
 Historical Food Fortnightly. The next challenge is Mock Foods and this is such a cool challenge I would have loved to do something a little more difficult. Still, I think it’s hard to find an era which is more known for mock foods than the early 20th century, and in fact I still have my grandmother’s recipe for mock cream.


Between the Depression and two world wars, thrifty housewives everywhere swapped recipes for dishes that were either too expensive, or which used ingredients which simply couldn’t be found. A quick search of the digitised newspapers on Trove brings up hundreds of results from the 1930s to the 1950s, ranging from mock whitebait to mock brains, even mock potatoes!

Recipe

1935 ‘Prize Recipe – Mock Crab’, Daily Standard, 14 September p.8 

Although I was tempted by a recipe for mock ham (made from a corned leg of lamb), I ended up going with a recipe for mock crab. Although it didn’t look like much, it was easy, fast and dare I say it, quite tasty on toast. It’s really an amazingly comforting dish, like a cross between scrambled eggs and a cheese toastie. The only thing is, I don’t think it really tastes or looks like crab!


The recipe is so simple that it’s not really worth writing a redaction. You cover the tomatoes (I used three) with boiling water and after a minute or so, scoop them out and peel them. Dice the tomatoes and cook over medium heat with some salt and pepper until soft. This produces a lot of juice, so you pour that off, then stir in an egg and a cup of grated cheese. Cook until it thickens to your liking (mine looked a bit like scrambled eggs in the end). Serve hot on toast, or cold on sandwiches.

IMG_4100

The Recipe: Mock Crab (available here).

The Date: 14 September 1935

How did you make it? See above.

Time to complete?: 20 mins.

How successful was it?:  It looked pretty awful, but I ate it hot on toast for dinner and it was very good. Cheesy and very comforting.

How accurate?: I wasn’t sure whether to chop the tomatoes or not because there is no instruction, but that seems to be what is done in other recipes and I don’t see how else you could do it.


1935 ‘PRIZE RECIPE.’, Daily Standard (Brisbane, Qld. : 1912 – 1936), 14 September, p. 8., viewed 05 May 2016, http://nla.gov.au/nla.news-article186190462


Parkin: Attempt No. 2

Parkin, recipe from 1926

Having struggled with the last parkin recipe that I tried, but with most of a jar of treacle still to use up I have had another go. Parkin No. 2 was more successful, in that it was at least edible, but still a far cry from the pictures of soft, moist, cake-y parkin that accompany modern recipes.

What is interesting is the way that parkin has evolved in the nearly 100 years between the recipe from 1830 (the earliest one that has been found so far, and very similar to the one from 1867 that I made last week) and this recipe from 1926.

“Parkin. Half a pound of fine oatmeal, half a pound of flour, 6oz. of butter or dripping, quarter of a pound of brown sugar, half a pound of treacle, half an ounce of ground ginger, the grated rind of a lemon, a quarter of a teaspoonful of powdered cloves, one teaspoonful of bicarbonate of soda, one teaspoonful of alt. Mix together the oatmeal, flour, salt, ginger, cloves, lemon rind and soda. Melt the treacle, butter, and sugar together in a saucepan until thoroughly dissolved. Make a well in the centre of the dry ingredients, and into this pour the hot liquid. Beat the whole together well. Turn the mixture into a shallow baking tin, and bake in a slow oven for one hour.”[1]

By Spider.Dog (http://www.flickr.com/photos/spiderdog/2484274442/) [CC BY-SA 2.0 (http://creativecommons.org/licenses/by-sa/2.0)], via Wikimedia Commons

By Spider.Dog [CC BY-SA 2.0], via Wikimedia Commons. See the lovely, soft, cake-like texture of modern parkin? 

The mixture is now a bit more like a cake, with the addition of flour and bicarbonate of soda, and it is less bitter thanks to the brown sugar. The shift towards a sweeter, less bitter, product would continue. A quick look at recipes for parkin in Australian newspapers shows that golden syrup was suggested as an alternative to treacle from 1912. In the mid-1920s it was common to combine treacle and golden syrup and by the 1940s many recipes just use golden syrup. Of course, many people would object that it isn’t really parkin if it doesn’t use treacle!

The flavouring has also changed, with less of the fiery ginger and no caraway, but a little clove and lemon instead. For me, it was this change in the flavour profile that really made the difference, even though the texture still left something to be desired.

The process however remains much the same. The butter, treacle (and sugar) are melted together and added to the dried ingredients before being pressed into a tin and baked at a low heat (although there are exceptions, see for example this recipe in which the fat is rubbed into the dry ingredients).

If you’ve ever made Anzac biscuits this might sound familiar, and as The Colonial Gastronomer brought up in the comments on the last post, it has been suggested that parkin was the origin for Anzacs. Culinary historian Allison Reynolds makes a brief mention of the connection in this radio interview. The real difference that strikes me is the process of adding the raising agent which, in Anzac biscuits, is normally added to the hot liquids. Does anyone know of any parkin recipes which do that too?

[1] “PARKIN.,” Examiner, April 6, 1926.

Parkin, recipe from 1926

The Redaction

115g oatmeal

115g flour

8g ginger

A sprinkle of clove

1/2 lemon rind

1/2 tsp baking soda

1/2 tsp salt

120g treacle

85g butter

60g brown sugar

  1. Preheat the oven to 150°C. Grease a loaf tin.
  2. Mix the oatmeal, flour, ginger, clove, lemon rind, baking soda and salt in a medium bowl. Create a well in the centre.
  3. Gently heat the treacle, butter and brown sugar in a saucepan until melted and well combined. Pour the liquid into the well in the dry ingredients and stir to combine.
  4. Press the mixture into the base of the greased loaf tin and bake for an hour or until firm and lightly browned.

The Round-Up

The Recipe: Parkin from The Examiner (available here)

The Date: 1926

How did you make it? See above.

Time to complete?: 1 hr 30 mins

How successful was it?: It tasted much better than the previous recipe but was very dry and hard. It still had a bit of a tendency to crumble. The hardness may be typical though, this recipe suggests that freshly baked parkin is always too hard to eat but that it softens over time. Mine is about 24 hours old, so maybe it will improve yet.

How accurate?: The oatmeal wasn’t really fine enough which may be why it is crumbling.

Bibliography

“PARKIN.” Examiner. April 6, 1926. http://nla.gov.au/nla.news-article91626220.

Peach Snowballs

Peach Snowballs, recipe from 1895

I made these peach snowballs months and months ago, but never quite got around to writing up the recipe. We’ve talked before about Mina Lawson’s The Antipodean Cookery Book when I made potato corks. Just like the potato corks, these peach snowballs are all about fast, cheap and filling food; they only have three ingredients after all!

The Recipe

Recipes like this one are known from the late 18th century and continue to appear throughout the 19th century. Nearly all are balls of rice wrapped around an apple, or apple pieces, but some are more unusual. Rachel Snell has written about snowballs in the context of 19th century class concerns and budget constraints[1]. She has suggested that the rice versions may be a variation on earlier dumpling recipes which use pastry rather than rice. Another possible forerunner of the snowball might be something like the recipe for ‘A cheap Rice Pudding’ from The Whole Duty of a Woman[2]. This recipe calls for the rice to be mixed with raisins then gathered in a pudding cloth and boiled.

Yet another variation is to omit the apple and a recipe for this appears in the Canadian book The Frugal Housewife’s Manual, where we are instructed to simply form balls of rice and serve them with a sauce[3]. A similar recipe appears in an 1895 Australian newspaper, however these snowballs are moulded in cups rather than being boiled in a cloth[4]. Interestingly, this is followed by a recipe for ‘Apple Dumplings’ which are clearly the same as ‘Snowballs’.

Yet in all these recipes, except for the one with raisins and a single Eliza Acton recipe which uses oranges[5], the fruit is always apples. This makes the following recipe for peach snowballs in The Antipodean Cookery Book rather unusual.

“Peach Snowballs: – Ingredients: 1 pound of rice, some sugar, 6 peaches. Mode: Throw the rice into a saucepan of boiling water and let it boil from five to seven minutes. Drain it, and when it has cooled spread it in equal parts on six small pudding cloths. Peel the peaches carefully, coat them thickly with sugar and place one in the centre of each layer of rice; gather the cloth round and securely tie it. Then plunge these puddings into boiling water, and when done turn them out, sprinkle with sugar, and serve with a sweet sauce over them. Time, one hour and a half to boil.”[6]

Peach Snowballs, recipe from 1895

The Redaction

As I’m sure you’ve already figured out from the picture above, I had a lot of difficulty getting the rice to form a nice smooth ball around the peaches. Kevin Carter over at Savoring the Past has an excellent article about apple snowballs, and it includes a video which you might want to watch if you are going to give this recipe a go. He also recommends using medium grained sticky rice, and that might be better than the long grained rice that I used.

Peach Snowballs

For 2 snowballs

150g rice

Sugar

2 peaches

  1. Bring a saucepan of water to the boil and add the rice. Boil for 5-7 minutes. Drain the rice and allow to cool slightly.
  2. Carefully peel the peaches and roll them in sugar until evenly covered.
  3. Bring a large saucepan of water to the boil.
  4. Cut a piece of calico into 2 squares with sides about 20cm long. Place half the drained rice into the middle of each square and spread it out in a circle. Place the peach in the middle and gather the four corners of the cloth at the top. Use your hands to spread the rice around the peach and when it seems to be evenly covered tie off the cloth.
  5. Place the balls into the boiling water and boil for an hour and a half.

Peach Snowballs, recipe from 1895

The Round-Up

The Recipe: Peach Snowballs from The Antipodean Cookery Book by Mrs Lance Rawson

The Date: 1895

How did you make it? See above.

Time to complete?: 2 hours.

How successful was it?: The peach was delicious, but the rice fell apart around  and was so watery that it didn’t taste very good.

How accurate?: I’m not sure what type of rice Mrs Lawson would have used, I used what I had on hand and maybe it was the wrong type since it didn’t hold together well.

[1] Rachel A Snell, “Snowballs: Intermixing Gentility and Frugality in Nineteenth Century Baking,” The Recipes Project, August 13, 2015, http://recipes.hypotheses.org/category/family-and-household.

[2] Anonymous, The Whole Duty of a Woman, Or, An Infallible Guide to the Fair Sex: Containing Rules, Directions, and Observations, for Their Conduct and Behavior Through All Ages and Circumstances of Life, as Virgins, Wives, Or Widows : With … Rules and Receipts in Every Kind of Cookery … (London: Printed for T. Read in Dogwell Court, White-Fryers, Fleet Street, 1737), 476.

[3] A.B of Grimsby, The Frugal Housewife’s Manual : Containing a Number of Useful Receipts, Carefully Selected, and Well Adapted to the Use of Families in General : To Which Are Added Plain and Practical Directions for the Cultivation and Management of Some of the Most Useful Culinary Vegetables (Toronto: s.n., 1840), 9, http://eco.canadiana.ca/view/oocihm.90013/13?r=0&s=1.

[4] “SOME RICE RECIPES.,” Leader, June 15, 1895.

[5] Eliza Acton, Modern Cookery, in All Its Branches: Reduced to a System of Easy Practice, for the Use of Private Families. In a Series of Receipts, Which Have Been Strictly Tested, and Are Given with the Most Minute Exactness (Lea and Blanchard, 1845), 282.

[6] Mrs. Lance Rawson, The Antipodean Cookery Book and Kitchen Companion (Kenthurst, NSW: Kangaroo Press, n.d.), 64.

Peach Snowballs, recipe from 1895

Bibliography

A.B of Grimsby. The Frugal Housewife’s Manual : Containing a Number of Useful Receipts, Carefully Selected, and Well Adapted to the Use of Families in General : To Which Are Added Plain and Practical Directions for the Cultivation and Management of Some of the Most Useful Culinary Vegetables. Toronto: s.n., 1840. http://eco.canadiana.ca/view/oocihm.90013/13?r=0&s=1.

Acton, Eliza. Modern Cookery, in All Its Branches: Reduced to a System of Easy Practice, for the Use of Private Families. In a Series of Receipts, Which Have Been Strictly Tested, and Are Given with the Most Minute Exactness. Lea and Blanchard, 1845.

Anonymous. The Whole Duty of a Woman, Or, An Infallible Guide to the Fair Sex: Containing Rules, Directions, and Observations, for Their Conduct and Behavior Through All Ages and Circumstances of Life, as Virgins, Wives, Or Widows : With … Rules and Receipts in Every Kind of Cookery … London: Printed for T. Read in Dogwell Court, White-Fryers, Fleet Street, 1737.

Rawson, Mrs. Lance. The Antipodean Cookery Book and Kitchen Companion. Kenthurst, NSW: Kangaroo Press, n.d.

Snell, Rachel A. “Snowballs: Intermixing Gentility and Frugality in Nineteenth Century Baking.” The Recipes Project, August 13, 2015. http://recipes.hypotheses.org/category/family-and-household.

“SOME RICE RECIPES.” Leader. June 15, 1895.

Bonus recipe: A Carrot Pudding

IMG_4279

This is a bonus recipe for the Working Class Dinner challenge, it’s a dessert which, like the potato pudding, is based on a root vegetable. Carrot Puddings have a much longer history that I ever would have thought, and the Carrot Museum has collected recipes through the centuries that makes for very interesting reading. The recipe that I chose comes from the Lady’s Column of the Australasian newspaper in 1869.

Baked Carrot Pudding.—Take three quarters of a pound of carrots, half a pound of breadcrumbs, a quarter of a pound of raisins,four ounces of suet, a quarter of a pound of currants, three ounces of loaf sugar, three eggs, some nutmeg, and a little milk. Boil and pulp the carrots, add to them the breadcrumbs, the raisins stoned, the suet chopped very fine, a little nutmeg, and three ounces of sugar pounded; well beat the eggs, and add them to a sufficient quantity of milk to make the ingredients into a thick batter, then put it into a buttered pie-dish and bake it. When done, turn it out and sift sugar over it.[1]

Like its potato counterpart, this recipe is cheap, quick and uses up left-overs. It’s all about making the most of the natural sweetness of the carrots and the dried fruit, bulked out with stale breadcrumbs.

Carrot pudding, recipe from 1869

The Redaction

Baked Carrot Pudding

340g carrots, peeled and chopped

230g breadcrumbs, freshly made from stale bread is best

115g raisins

115g suet, fresh if you can get it but the suet sold in boxes in the supermarket also works

115g currants

90g sugar

1/2 tsp nutmeg

3 eggs, beaten

Milk

Sugar, to serve

  1. Heat the oven to 180˚C. Grease a pie or casserole dish very well. Boil the carrots until very soft, then mash them until smooth.
  2. Combine the breadcrumbs, suet, dried fruit, sugar and nutmeg in a large mixing bowl. Add the carrots and the beaten eggs. Stir well, then add enough milk to make a thick batter, thicker than cake batter.
  3. Pour the batter into the prepared dish and bake for 45 minutes, or until golden and a skewer inserted into the middle comes out clean. When it’s done allow it to cool a little, but while still warm very carefully turn it out onto a plate. You may need to carefully run a knife around the edge of the dish. Serve warm, sprinkled with sugar.

The Round-Up

The Recipe: Baked Carrot Pudding from the Australasian newspaper(available here)

The Date: 1869

How did you make it? See above.

Time to complete?: About an 1 hr 15.

How successful was it?: Surprisingly tasty, like a very thick carrot cake. It wasn’t overly sweet, but the little bursts of sweetness provided by the currants and raisins were very popular with my taste testers. They also liked it with the very non-historically accurate Greek yoghurt, but because it can be a bit dry it probably is a good idea to serve it with cream or something similar.

How accurate?: Fresh suet would have been better but I was trying to use up some of the ingredients in my mum’s larder, and I think that that is well within the mindset of a Victorian working class cook.

[1] “RECIPES.,” The Australasian, March 6, 1869.

Carrot pudding, recipe from 1869

Bibliography

“RECIPES.” The Australasian. March 6, 1869.

css.php